Chapter 9: Spatial Analysis: Buffers, service areas, facility location models, and clustering
9.1
- A buffer is a polygon surrounding map features of a feature class. The radius of the buffer is specified and, generally, the radius is used to find what’s hear the feature being buffered
- Use the Pairwise Buffer Tool. Created buffer data can be summarized and analyzed using the Summarize tool
9.2
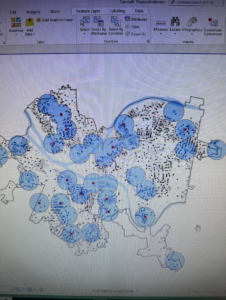
- Multiple ring buffers can be configured to be separate polygons to therefore allow you to select other features within given distance ranges from the buffered feature. Use the Multiple Ring Buffer Tool
- Use the Spatial Join Tool to use spatial overlay to get statistics by buffer area. It joins all attributes of the multiple ring buffer to block centroids and sums the numbers inside each ring
9.3
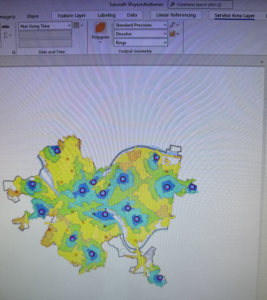
- Service areas are like buffers but are based on travel over a network, usually a street network dataset
- Gravity model: Assumes that the farther apart two features are, the less attraction between them. The falloff in attraction with distance is often nonlinear and rapid, as in Newton’s gravity model for physical objects, where the denominator of attraction is distance squared
- Use the 7 step workflow
9.4
- When using the location allocation model, demand is represented by polygon centroids, blocks, block groups, tracts, zip codes, and so on, for which you have data on the target population
- This section ran a model to choose the best of the locations to remain open using geographic access as the criteria. Use the Location Allocation tool under the Analysis tab, in the Workflows section, under Network Analysis to create a new layer in the Contents pane
9.5
- The goal of data mining is exploration. Data clustering, a branch of data mining finds clusters of data points that are close to each other but distant from points of other clusters
- A limitation of clustering is that there is no way of knowing true clusters in real data to compare with what an algorithm determines are clusters. Therefore, it is purely exploratory.
- K-means clustering is a simple method in the Multivariate Clustering Tool that partitions a dataset with n observations and p variables into k<n clusters. K-means assumes that all attributes are equally important for clustering because it uses distance between numeric points as its basis. 5 clusters is generally most informative.
- Each observation is a 3D vector and is characterized by its centroid with the corresponding means of each cluster variable
Chapter 10 Raster GIS
10.1
- Raster layers are for continuous features like satellite images, topography, and precipitation. You can also use raster layers to display an attribute such as population for large numbers of vector features like city blocks or countries.
- Raster dataset is a generic name for a cell based map layer stored on a disk in a raster data format
- All raster datasets have at least one band of values. A band is comparable to an attribute for vector layers and stores the values in a single attribute in an array. The values can be + or – integers or floating point numbers
- Color capture and representation in raster datasets is important. Spatial resolution is the length of one side of a square pixel
- The Raster to Other Tool can import a raster dataset into a file geodatabase
10.2
- Kernel Density Smoothing (KDS) is a widely used method in statistics for smoothing data spatially. The input is a vector point layer, often of center points of polygons for population data or point locations
- It accomplishes smoothing by placing a kernel, a bell shaped surface with surface area 1, over each point. If there is population, N, at a point, the kernel is multiplied by N so that its total area is N. Then all kernels are summed to produced a smoothed surface, a raster dataset
- The key parameter of KDS is its search radius, which corresponds to the radius of the kernel’s footprint. If the search radius is small, you will get highly peaked mountains, or, if large, you get wider rolling hills.
- There are no exact guidelines on how to choose a search radius
- Can be good for representing demand surface for a good or service because its data smoothing represents the uncertainty of locations for future demand relative to historical demand
- Use the Kernel Density Tool
10.3
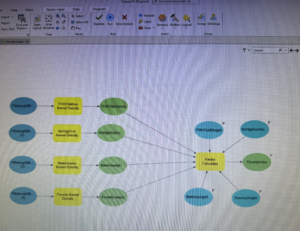
- Instead of code scripting, you can drag tools to a canvas and connect them in a workflow using ModelBuilder that you can use to run code.
- If you have a reasonable theory that several variables are predictive of a dependent variable of interest such as poverty (whether the dependent variable is observable), the Dawes method contends that you can proceed by removing scale from each input arable and averaging the scales inputted to create a predictive index. This can be used for a risk index model.
- Alternatively, you can assign different weights to different variables according to your preference. A good way to remove scale from a variable is to calculate z scores, subtracting the mean and dividing by the standard deviation for each value of a variable. Each standardized variable has a mean of zero and a SD of one (and therefore no scale).

Chapter 11: 3D GIS
11.1
- Global viewing model: For large extent, real world content in which the curvature of the earth is important
- Local viewing model: Small extent content in a projected coordinate system or for situations in which the curvature of the earth isn’t important
- Understanding a scene’s elevation surface, map units, and heights is important to the scene
- Use mouse wheel to tilt view, J or U on keyboard to move map up/down, A or D to rotate view clockwise or counterclockwise, W or S to tilt camera up/down, arrow keys to move the view, B and left arrow to look around, N to view true north, P to look straight down
- You can exaggerate a landscape with visual effects to help it stand out. It doesn’t change the elevation, just makes it more prominent. This can include lighting or time of day. Use the Elevation Surface Layer tab for light position and vertical exaggeration. Use Contents pane + properties of 3D scene for Date/time/illumination
11.2
- An advantage of local scenes is using your own elevation surface data such as triangulated irregular networks (TIN’s) or lidar data, using a projected coordinate system, managing features below a surface, and more accessible editing of data
- TIN’s are typically used for high precision modeling of small areas to allow for the calculation of surface area and volume. They are also useful for viewing underground features. Use the Create Tin Tool
11.3
- You can import 3D models and symbolize 2D features as 3D features and specify the source of your z-values when you create features
- The Current Z Control Tool is used to set the 3D elevation source for drawing or obtaining Z-values
- This is useful if more than one source is defined for a global or local scale, or if you java another source not already included in the map
- The Create Feature Class geoprocessing tool allows you to determine the required output feature class’ z-values
- I planted trees 🙂
11.4
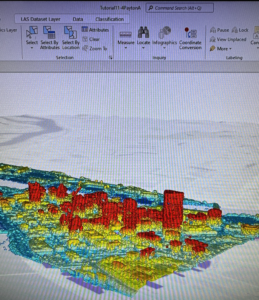
- The generation of 3D buildings from lidar LAS datasets requires two surface models: a digital surface model (DSM) and a digital terrain model (DTM)
- A LAS dataset created from original LAS data provides fast access to lidar data without the need for data conversion to work with LAS files for a specific study area
- Use Create LAS Dataset tool
- DSMs represent the surface of the earth, including buildings, tree canopies, and other things that create a surface above the terrain.
- LAS Dataset to Raster tool to create DSM
- DTM contains only the topology, a bare earth terrain surface. In many cases, it is the same as a digital elevation model (DEM). Before creating the raster, you filter the ground features
- An nDSM surface is the difference between the DSM and DTM surfaces that is normalized to the bare earth surface. You can use this raster surface to apply point features used for buildings to determine their height. Use the Create Random Points Tool. Assign z-values (height) from the nDSM raster surface using the Add Surface Information Tool. The Summary Statistics tool calculates the maximum Z Value for all buildings using the building’s random points
11.5
- Editing building polygons that are already 3D features to create multiple floors in a building and view floors using a range slider and manually edit polygons’ heights using z constraints
- Use the Duplicate Vertical Tool to create floors. You can also use this tool to copy points or lines (like furniture or pipes) in a positive or negative direction
- Add a range slider to visualize certain floors
11.6
- A CityEngine rule package (.rpk) is a file that contains a compiled rule and all the assets (textures and 3D models) that rule logic uses for creating 3D content. You can use these packages to create symbology that constructs and draws the procedural feature on the fly from the source data
- Another method that creates 3D models and stores them as a feature class is called a multipatch, whose features are a collection of patches that represent the boundary of a 3D object. It stores color, texture, transparency, and geometric data in its features
- When you apply procedural rules, you must display features as layers in a scene. The feature class polygon itself does not have to include Z Values, but it must be in a scene, and you can use 2D layers such as building polygons
11.7
- Animations are created by capturing an ordered set of viewpoints (such as bookmarks) as keyframes and managing how the camera transition between them
- Find the animation tool under the View tab in the Animation group, then click Add
- To export an animation, in the export group, click the Movie button. In the export movie pane, in the movie export presets group, click Draft.