Ogrodowski Week 7

Data Inventory:

Zip Code: Contains all of the zip codes that fall (either completely or partially) within Delaware County. These parcels were created in 2005 according to property addresses, likely to ensure that properties were not split across zip codes.

Street Centerline: This data depicts the center of the pavement of all public and private roads in Delaware County to give a fair approximation of street routes throughout the county. This street system is called the Ohio Location-Based Response System (LBRS) and is heavily used by ODOT and emergency services. Street segments are measured from vertex to vertex.

MSAG: The Master Street Address Guide (MSAG) delineates townships and municipalities in Delaware County. Most townships are simple geometric rectangles, but the municipalities are irregularly shaped. Some municipalities are also their own townships, and they are located inside of other townships, as is the case with Sunbury Township located inside of Berkshire Township.

Recorded Document: These are records that do not match up with the subdivisions that currently exist on the Delaware County map. They include records of vacations, cemeteries, road centerline surveys, and utilities easements.

Survey: This dataset is a collection of the locations of all recorded land surveys in Delaware County more recent than Old Survey Volumes 1-11. There is a pretty high density of land surveys all throughout the county, except over bodies of water and in parks like Alum Creek State Park, Delaware State Park, and the Dover Recreation Area.

GPS: This dataset displays the shapefile of GPS monuments, or metal disks in the ground that mark latitude and longitude and serve as reference points. These monuments were established between 1991 and 1997. 

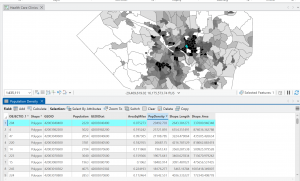
Parcel: This dataset is incredibly detailed, showing land parcels in Delaware by ownership. Contains extensive information on each property, such as the address, current owner, sale history, and number of rooms.

Subdivision: This dataset contains subdivisions and condos in Delaware County. (These types of housing are typically higher-density residential areas.) Most subdivisions appear to be concentrated around the town of Delaware or the southern part of the county.

School District: All the school districts in Delaware County are displayed in this data set. Similar to the Zip Code data set, some small portions of school districts that mostly fall within adjacent counties are included.

Tax District: The tax district dataset appears to line up similarly to the MSAG data set but includes a few more divisions. Most of the tax districts around municipalities are shaped irregularly and are even sometimes nested shapes within the more geometric townships.

Annexation: This dataset shows annexations in Delaware County. They are concentrated around towns like Delaware, Sunbury, Powell, and Westerville.

Township: Shows all of the townships in Delaware County. Very similar to the MSAG dataset.

Address Point: This dataset uses LBRS to show all registered addresses in a shapefile. The point on the map is located in the centroid of the building.

Municipality: This dataset contains the municipality parcels that are noticeable in the MSAG and Township datasets.

Condo: Condo polygons are shown in this dataset. They are pretty small and well-dispersed, which, when compared to the Subdivision dataset, leads me to believe that Delaware County has lots more houses in subdivisions than condos.

Precincts: Delaware County voting precincts line up pretty well with township and municipality parcels but are divided within into much smaller areas.

PLSS: This dataset contains Public Land Survey System (PLSS) polygons, most of which are near perfect squares. However, the west side of Delaware County comprises more irregular PLSS polygons.

Delaware County E911 Data: This dataset uses an LBRS system of Address Points and is used in particular by 911 Emergency Services. Other uses include appraisal mapping, geocoding, reporting accidents, and managing disasters. This is measured in terms of US Military and Virginia Military Survey Districts.

Farm Lot: Contains all farm lots (as measured by military districts). Many are different shapes: square, long and thin, uniform rectangular, or irregular (as in the western and central parts of the county).

Building Outline (2021, 2023, 2024): Contains all building outlines in Delaware County. Very reminiscent of a Google Maps view. Each of the three databases was updated in its respective year.

Dedicated ROW: ROW stands for Right-of-Way, which is a type of easement, so it shows accessible street routes in the form of line data. It appears that streets that are not included as ROW routes are in private subdivisions or similar areas.

Railroads: The dataset highlights railroads running through Delaware County, and it appears that most of them run north-south.

Original Township: Displays boundaries of Delaware County townships prior to division by tax districts. Consists of 18 original townships. The eastern portion of the county has rectangular parcels, and the western portion’s parcels are more irregularly shaped, which is consistent with other similar datasets.

Map Sheet: A map sheet is just a map that is part of a larger map series. The data appears to show data at the sub-municipality or sub-township level. The smallest parcels are clustered around the cities of Delaware and Sunbury, and in the southern portion of Delaware County.

Hydrology: Contains the portions of all *major* waterways in Delaware County. Many small ponds and lakes on the map do not appear to be counted in this dataset.

ROW: Just like the Dedicated ROW dataset, this contains all line data of street rights-of-way in Delaware County.

Delaware County Contours: Contains two-foot contours showing the topography of Delaware County. This data was updated in 2018. It is in the form of a downloadable geodatabase.
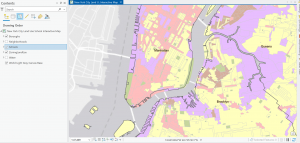
Map:

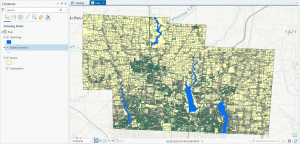
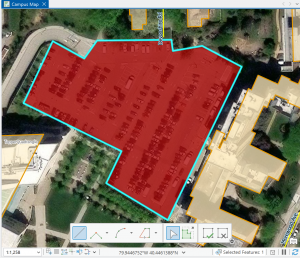
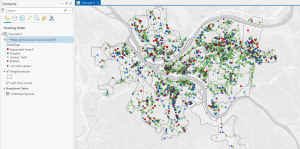
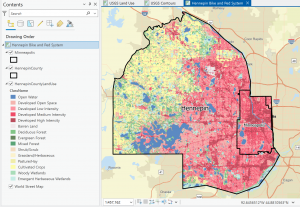
Figure 1: Delaware County Parcels (yellow), Street Centerline (green), and Hydrology (blue) layers.

Once I remembered I had to use the Add Folder button to add my files into the Catalog pane, it was smooth sailing making this map!


Ogrodowski Week 6

Chapter 7:

This chapter focused on digitizing, which meant that most of it was spent converting various forms of data into forms that work best in ArcGIS. This is super important because there is no universal method of data presentation, and being able to convert and create data of the desired form is crucial for any mapmaking. I was already familiar with many aspects of this chapter from working with other drawing and graphic design apps. I had a lot of fun with it!

Figure 7.1 Drawing a polygon for the parking lot. 

Creating polygons and using the Trace tool were my favorite parts of this chapter! Honestly, making polygons was easier than I was originally expecting. From the readings earlier in this course, I thought I was going to have to input geographic coordinates to put polygons into the correct spot. I learned that ArcGIS is much kinder and allows you to simply drag and rotate polygons. It’s also very helpful to have a matching basemap or base layers to which you can size your polygons.

Also, I was pleasantly surprised by the capabilities of the Smoothing tool. Once again, I thought there was going to be some sort of complicated algorithm I would have to go through to get a smooth shape, but it’s thankfully just another tool! (I’m sure that the computer performs complicated steps, but I am grateful that I don’t have to do them myself.)

Figure 7.2:  Transforming the SpacePlan layer onto the StudyBldgs layer. 

It took me a few tries to get this right because I attempted to complete this step before looking at the reference photo in the tutorial. At first, I tried drawing an outline around the SpacePlan layer…which definitely did not work. Then, I tried transforming every single vertex, which was unnecessary. (That attempt is shown in the picture above.)

Chapter 8:

This chapter, focused on geocoding, was pretty short. However, there was still a wealth of important techniques and information within! Something that sounded super interesting to me in the beginning of the chapter was the use of Soundex keys to match attribute names (ex. streets) that are not spelled correctly. It seems like a really neat way to code and simplify language. The step I struggled with the most in this chapter was rematching attendee data. For whatever reason, when I tried to click on an individual location, I struggled to find the Match button and successfully rematch the addresses.

Figure 8.1 Distribution of Attendees using Collect Events tool.

I liked using the Collect Events tool. Being able to turn individual events within certain tracts into collective graduated symbols is a really helpful way to look at the data differently! The concept of match scores is also pretty neat. It’s proof that though the computer is faster at computing than humans, it’s not necessarily smarter. Though the computer does make conjectures and assumptions looking at local context in the data, it doesn’t have the natural reasoning or critical thinking of humans. So yes, mistakes (when inputting addresses, for example) are made by humans in the first place, but then humans go back in after the computer has done its best and apply personal knowledge and community context clues to fill in the gaps.

Chapter 9:

This chapter focused on applying advanced GIS technologies, but thankfully, I found it pretty easy. Tutorial 9-1 introduces the concept of buffers, which I recall reading about in the other text. I find the concept of mapping with buffers really useful and interesting! Buffers are great for determining if objects fall within a certain radius, which is particularly important in fields like public health when determining who may or may not have access to a particular service or facility. 

Figure 9.1: 0.5- and 1-mile buffers around public pools in Allegheny County, Pittsburgh.

There are 42, 548 youths in the city of Pittsburgh within 1 mile of a pool, which means 87% of youths in Pittsburgh have good accessibility to a pool. (There are 48,903 total youths in Pittsburgh.) In Pittsburgh, 10,718 youth have excellent access to a pool, 20,448 have good access, and 16,264 have fair or poor access. This corresponds to percentages of 22%, 42%, and 33%, respectively. Considering that more youths in Pittsburgh have fair or poor pool access than those with excellent pool access, changes should be made to ensure that more pools can be open for these kids. (Or alternatively, some areas with high pool density can close and those resources can be reallocated to open a pool in an area where it might be the only one.

In Tutorial 9-5, for whatever reason, some of the Cluster IDs were numbered differently, so I had to pay attention while relabeling the features to ensure they matched the data correctly.

Figure 9.2 Serious Violent Crimes by Age and Gender

The square shapes correspond to young age groups that committed crimes. The pink and purple shapes are females, and the yellow, green, and blue shapes are males. If I were to take this analysis further, I could impose these features on a streets basemap to determine where they are occurring in terms of area development, or I could create a graduated colors map measuring income to see if more crimes are being committed in lower income areas. 

All of the tutorials are done…hooray! I just want to give a shoutout to the geoprocessing toolbox…absolutely clutch! I would get so excited every time I saw that I could just plug in my inputs and outputs, units of measurement, and queries. Literal lifesaver. 5 stars.

Ogrodowski Week 5

Chapter 4:

An accidental benefit of this chapter was becoming more familiar with my file explorer. I had to restart Tutorial 4-1 because I was struggling a bit to create filepaths, but I got the hang of it after a bit. This chapter also helped me get a lot better at working with attribute tables. It’s becoming more intuitive, and I’m beginning to sense patterns and use keyboard shortcuts. 🙂

In Tutorial 4-5, I was intrigued by what the tutorial meant when it said we wanted to calculate central points instead of centroids. After doing a quick internet search, I realized that it is important for tracts of irregular shape. In some cases, the technical “centroid” of an irregular shape might fall outside of the boundaries of the shape. Therefore, opting to choose a “central point” that looks good visually is accurate enough for this map. I followed through with the central points method that the tutorial suggested, but out of curiosity I tested what would happen if I left these dots as centroids.

Figure 4.1: Graduated Symbols Map of Burglaries by Neighborhoods–as displayed by centroid points. Notice the dots circled in green are located on tract lines or in a completely different tract from the one they are representing. This is why we select the “Inside” option to display general, more visually intuitive central points.

Figure 4.2: Pittsburgh Serious Crimes Summer 2015. I changed the symbol shape for each type of crime, which makes the map a bit more visually intuitive.

Personally, I think the map in Figure 4.2 still looks a little clunky. For the purpose of the tutorial and for noticing general trends it’s fine, but if I were to use this map to discuss trends, I might create sub-symbols (especially for Larceny-Theft crimes) or summarize the data with graduated colors or even numerical values.

Chapter 5:

I enjoyed the beginning of this chapter. As the tutorial walked me through how to import files to the geodatabase, navigate my file explorer, and convert files into various formats, I did ok.

The first few tutorials dealing with map and coordinate system projections were kinda boring. I understand why maintaining a consistent map projection is important, but to be honest, I felt like it was a lot of repetitive work to change projection status for every layer. On the county/regional level it’s not really necessary, but I did realize just how crucial this extra check is when looking at a national or global map.

Figure 5.1: New York School Districts (light gray outline) and Libraries (green dots).

As the chapter went on, I began to have some trouble completing the tutorials. I guess all of the file downloading and transferring was not super intuitive to me. There were several times when I realized that I had completed a previous step incorrectly and had to retrace my steps. In particular, I had a bit of trouble figuring out the Add Join feature during Tutorial 5-5. I don’t think my join worked completely, because I could not transfer the tracts data correctly, so my choropleth maps were a little off. However, from looking at the maps in the tutorial, it appears that men bike to work around Minneapolis from a larger radius than women.

Figure 5.2: Hennepin County Land Use. I notice that the (south)eastern portion of the county is mostly developed land (because of the proximity to the city of Minneapolis) while the western portion of the county is more cropland and water.

I hope to further develop the skills that I began to learn in this chapter. I think being able to import my own data from websites like those used in the tutorials will be crucial to any personal work I might do with GIS.

Chapter 6:

Thankfully, this chapter *did* help me improve the skills that were troubling me last chapter. This section focused on geoprocessing, and I spent a lot of time working with merging, clipping, and uniting to analyze spatial data patterns. I’m getting a lot better at working with filepaths, and I’m anticipating patterns when it comes to determining input fields and other criteria while running tools. All of the processes I learned in this chapter seem super useful!

Figure 6.1: Manhattan Streets clipped to fit within the Upper West Side tract. The Clip tool seems super helpful with geoprocessing techniques when different layers don’t automatically coincide with each other.

Figure 6.2: Upper West Side Manhattan Fire Company Service Areas (black outline) overlaid on Tracts (graduated colors). Yellow-highlighted numbers indicate the amount of disabled people in each tract, but because the tracts do not align with the fire company service polygons, more processing has to be done to determine the amount of disabled people in each tract.

As mentioned in the tutorial, the neighborhood tracts and areas each fire company serves do not line up perfectly. That means that some tracts will be split in terms of service, so just from looking at the map we cannot determine exactly how many disabled people are served by each fire company. However, by running Summary Statistics, I was able to determine this. The results are shown in the attribute table in Figure 6.2.

Ogrodowski Week 4

Okay, so that was really fun! I found that it didn’t take long for the steps to become intuitive. Having the step-by-step tutorial took all of the guesswork out of navigation, which was so nice because ArcGIS is chock-full of important features. I also appreciated how the book would explain multiple different ways to access software features. Some were more complicated than others but knowing all of them will be helpful in the long run.

Chapter 1 Tutorial:

This chapter of the GIS tutorial introduced basic ways to navigate ArcGIS with a map of Allegheny County, Pennsylvania. It spent a lot of time exploring layers showing spatial distribution of FQHC clinics and “urgent care” clinics, and how they relate to population density and poverty risk areas.

I found myself making conjectures that were then confirmed by steps in the tutorial. For example, after overlaying the poverty risk area boundary with the service radii of both the FQHCs and “urgent care” clinics, I noticed that a small node of high population density and poverty risk was located outside of any health center radius. Then in the following step, the tutorial had me bookmark that area as the McKeesport Poverty Area.

Figure 1: The small red circle outlines the McKeesport Poverty Area.

After reading the first six chapters of Mitchell, I was nervous to do work with tables in ArcGIS because they seemed complicated. However, when all the information was supplied, I didn’t think it was difficult at all. I got used to sorting and editing field views quickly.

Figure 2: The census tract with the highest density in Allegheny County of 29,493 people per square mile.

I noticed that this area is only 0.075 square miles, which is really small! Looking at the tract area in square miles was helpful, because I initially envisioned 29,000 people living in that small area. I needed to keep in mind that the map measures population DENSITY, not raw population.

Chapter 2 Tutorial:
This tutorial chapter focused on a map of New York City and studied distribution of features like food facilities, people reliant on food stamps, and schools. Working with colors in this section was fun! I was able to familiarize myself with symbology with different shapes, graduated sizes, and color shading of map parcels.

Figure 1: graduated symbols for Number of Food Banks/Soup Kitchens (yellow) and Under 18 Receiving Food Stamps (purple) overlaid on a map of Over Age 60 Receiving Food Stamps in the Bronx. 

At first, I was a bit confused during Tutorial 2-5. At first, the purple graduated symbols were overlapping and overshadowing the yellow symbols. So, I moved “Number of Food Banks/Soup Kitchens” to the top of the Contents pane, and now I could see these yellow symbols outlined by the “Under 18 Receiving Food Stamps” purple symbols in the Bronx neighborhood. I noticed that, in the neighborhoods with more than 11,595 people over 60 on food stamps (in dark blue), there are also thousands of people under 18 on food stamps (larger purple symbols). And now that we can see the number of food banks/soup kitchens on top of the purple dots, we notice that there are small proportions of food facilities (in yellow).

In Tutorial 2-8, I appreciated the emphasis on definitions of large-scale and small-scale maps. Basically, the smaller the ratio, the smaller the scale, and the more zoomed-out the map will be. I’m still kind of developing the intuition for this, but while assigning feature layers visibility ranges, I was able to repeat this process without heavily consulting the tutorial.

Figure 2: A zoomed-out, small-scale view (1:47,409) of Manhattan. Visibility range for schools and neighborhoods is turned off.

Figure 3: Zoomed in, large-scale (1:19,419) view of Lower Manhattan. Visibility ranges for neighborhoods and schools (black dots) turned on.

Chapter 3 Tutorial:

This chapter focused on developing maps to share with the public on ArcGIS Online, with ArcGIS Story Maps and Dashboards. I have stumbled upon Story Maps before while doing research for other classes, and they seem to be pretty effective ways to present and discuss data!

In Tutorial 3-1, snapping the separate images of maps and legends onto the layout was so satisfying. The Guidelines feature was incredibly helpful, and it is going to inspire me to look for a similar feature in software I use for other classes.

Tutorial 3-3 demonstrated how to build ArcGIS StoryMaps. I found the editing interface of ArcGIS StoryMaps to be very intuitive. I probably made some minor formatting errors—there seemed to be a lot of white space—but for the most part, formatting text, maps, and images was pretty straightforward.

Figure 1: The Cost of Living Index map within the ArcGIS StoryMap. 

I liked how the tables and map information scrolled by while the map image remained on the screen. This layout makes comparisons on one screen super easy!

Tutorial 3-4 focused on turning maps and their data into interactive Dashboards. I found this software to be pretty easy to use as well, but I didn’t like it as much as StoryMaps.

Figure 2: completed Ground Crew Dashboard showing requests for debris and overgrowth removal. It is currently zoomed in on the Spring Hill City view, so the bar graph, pie chart, and table are showing data within this view alone.

The tutorials in this chapter emphasized the importance of creating effective map pop-ups as well. A person who will be using the map is going to want to be able to select areas of interest and receive all the information they need in a pop-up: nothing more, nothing less. The table in Figure contains all the fields that will show up in the pop-up when the user clicks on a specific green circle on the map.

Ogrodowski Week 3

Mitchell Chapter 4

Chapter 4, Mapping Density, shows the mapmaker where the targeted feature is concentrated. Density itself is a ratio, measuring counts (OR amounts) per unit area. Density can be valuable when working with boundaries creating areas of different sizes, like counties or census tracts. Two distinct areas might have the same number of features, like businesses or population, but their difference in size is what determines their densities.

Mapping density is a good way to summarize discrete data. You can plot density graphically as discrete data to get a “bird’s eye view” of feature distribution, then code each area on the map based on the number of features per unit area. This is helpful for understanding overall trends but does not show specific densities within each area boundary. I don’t think this method of mapping is particularly useful for planning; it may be helpful for general trends but not much else. In my opinion, an alternative that seems more ideal is the creation of a density surface with a raster layer. This creates an appearance of continuous shading that transcends boundary lines. Additionally, mapping by features and mapping by feature values can show trends differently. Mapping by features tells you where things are, but feature values (like number of employees) can show trends within the density of the feature.

One thing I didn’t really understand in this chapter was “you often display the dots based on smaller areas but draw the boundaries of larger areas.” In that case, are the dots are not 100% accurately transposed onto the area boundaries? I suppose it doesn’t have to be perfect because the purpose of density maps is just for noticing general trends, not worrying about exact locations.

Finally, this chapter circles back onto topics discussed in previous chapters, like determining the best cell size, ways to separate graduated colors, and contours. I bet that the best method of determining graduated colors depends on each individual map, but in the book’s examples, the natural breaks method seems the most effective.


Mitchell Chapter 5

Chapter 5, Finding What’s Inside, describes ways to look at what is happening inside of a certain area. This area can be on the map boundary already, like a census tract or county, or it can be a natural feature like a watershed, state park, or protected area superimposed onto a layer of preexisting map boundaries.

Density, as discussed in Chapter 4, is a frequent example of “finding what’s inside.” I found it really cool that the GIS can clip out the target area on a map to simplify our view of the continuous data inside of those boundaries, especially when those areas are disjunct. AND it can calculate amounts of land use/type within these specific areas? Sick!

There are three ways to show what mapped boundaries are inside a particular area. You can 1.) superimpose the target area on top of the map’s preexisting features, 2.) highlight parcels with any portion inside of the target area, or 3.) view the target area alone divided into the parcels that make it up. The entire target area is full, and no mapped boundaries beyond the target area are shown. As with most map-related topics, there are merits and drawbacks to each style of mapping here. Drawing the target area on top is a good basic visual, highlighting all included parcels shows a potentially larger scope of effect from the target area, and overlaying the features within the area can help summarize characteristics within the area.

This chapter gives several methods for drawing the target area on top of the map of parcels; the best method of which once again depends on how specific you want your map to be. I like comparing the different methods of color and shading, but all of this study of maps has led me to realize that in many cases, the simpler the map, the better. Using fewer colors and focusing on specific areas typically gives enough surface-level information for a general audience. Then, when more specialized information is needed, conclusions from the more general maps can be used to create the most relevant specific maps. Additionally, GIS software itself can take some of the manual labor out of category-making. One example that seems particularly useful is when one feature on one map splits itself between two features on another layer—the GIS will create two subcategories to split that feature in two.


Mitchell Chapter 6

Chapter 6, Finding What’s Nearby, seeks to help the mapper answer questions like, “What areas will a facility serve?” and “What should the facility expect in terms of service volume?” These questions are affected by “costs” such as distance and time, or literal monetary quantities like gas mileage.

There are three main ways to define analysis of finding what’s nearby: using straight-line distances, finding the distance or cost over a network, or measuring the cost over a surface. As with any other type of map analysis with multiple options, there are times and places for each method.

A straight-line method finds any features within a certain radius of the center. This method provides a quick, simple estimate of features within a spatial constraint, and is often used when determining buffer areas. One type of straight-line mapping that I found particularly interesting was the spider mapping method. This involves drawing straight lines from the center to features within the designated radius. These maps show if there is any skew in location of likely consumers, or if some consumers are in radii of multiple centers and can incite competition. However, this method fails to consider geographical obstacles. A feature may be within the specified distance of one center, but when travel costs are accounted for, another center may be in a more efficient location. 

These instances can be mapped by a method considering distance or cost over a network. This type of analysis is typically more considerate of real-world application, and considers the impedance value, or cost to travel from the center to surrounding locations. Some locations may be nearer than others but have higher impedance values, and a cost over a network method takes this into account. An example I found fascinating was taking different kinds of road turns and junctions into account when planning travel costs in terms of time. For example, a turn at a stop sign takes less time than one at a traffic light. A feature may be outside of a straight-line distance radius but have a lower travel cost than another feature within that radius.

Finally, mapping cost over surface is most commonly used for travel over terrain. It’s sort of a mix of the previous two methods: there’s not really an established infrastructure, but geographical land features are accounted for in travel costs. This method uses a raster layer to display continuous data, and the shading can illustrate differences in rates of change across terrain, showing where travel cost increases rapidly or slowly.

Ogrodowski Week 2

Mitchell Chapter 1

The introductory chapter, Introducing GIS Analysis, builds a basic framework and vocabulary for working with GIS. This chapter discusses types of geographic features that can be captured by GIS, like discrete features, continuous phenomena, and features summarized by area.

I was most intrigued by continuous phenomena, and I hope to learn more about the concept of interpolation, and how GIS develops the values for areas in between the discrete data points given. I’m probably not the only one who would say that data summarized by area is a rather familiar concept. A common example that comes to mind is the electoral college maps we watch on Election Day, where the magnitude of difference in votes between presidential candidates determines the color and shade of the state or county being observed.

This chapter also introduced me to the differences between vector and raster models. Vector models use coordinate points, which makes them ideal for displaying discrete data. Conversely, raster models seem to capture more nuanced variation in continuous data, which I noticed in the book’s orange and red “Elevation” map.

Mitchell also discusses some common geographic attributes of data. I was specifically interested in ranks; I think it is interesting that this category introduces an element of subjectivity. I can see how this feature would be useful but may be unfit for some situations where data is not very variable. I also learned the difference between counts and amountscounts are shown on the map, while amounts are numbers that might be associated with something on the map but not actually shown (i.e. on a map of parks, the parks are “counts,” but the number of benches at each park are “amounts.”)

Finally, Mitchell describes some ways to work with data tables containing the information on the GIS maps. Some of these are reminiscent of high school statistics topics, like the uses of “and” and “or” to broaden data selection. Just reading about all of this vocabulary is a bit overstimulating, but it all seems to be very helpful going forward.

Mitchell Chapter 2

Mitchell Chapter 2, Mapping Where Things Are, describes how to layer and categorize different features on a map, as well as the times and places for differing levels of detail in categorizing features. When developing a scientific research question, perhaps involving a specific hypothesis, it makes sense to use a map with more detailed codes for categories. Also, developing detailed codes as subsets of one category can reveal trends that may not have been visible in the entire data set. On the map of crimes, when all the data points are one category, you can notice some general “hotspots” of crime. However, when you separate the crimes into subcategories, and then isolate each subcategory on a map of its own, you may see that a high concentration of thefts occur on a particular street corner. When planning to solve the problem, a general solution might be deploying more police to the general crime hotspot. However, a more detailed analysis of the GIS data might encourage police to install better security measures like cameras and alarms on that street corner.

The best techniques will vary from map to map, depending on what you are trying to illustrate. When you are looking at a large-scale map, a great amount of detail might make it a little cluttered and overwhelming to look at. However, the general map might spark notice of some basic patterns, which can then be elaborated on in smaller-scale, more detailed maps.

(Side note: I found it interesting how Mitchell mentions that most people can only effectively decipher seven colors on a map at once. I’d say that’s a fair assessment–I’d be curious to do more research on the scientific “why” behind that!)

After reading this chapter and exploring its examples, I can see how GIS is a massively influential tool in analyzing and planning human activity. It seems like land use, transportation routes, and business traffic are three main topics in which GIS can be utilized to maximize efficiency or profit. However, with great power comes great responsibility. Those who use GIS in business or urban planning models must be careful to remember that any alterations to landscape, especially previously unaltered land, can set off a chain reaction of environmental injuries.

Mitchell Chapter 3

Chapter 3, Mapping the Most and the Least, brings topics in the previous two chapters together. It discusses ways to map categories and features, but instead of just looking at where things are or aren’t, Chapter 3 focuses on determining the areas that have the MOST of the target category. This helps the GIS user to determine where to concentrate their focus and efforts.

Mitchell makes an impactful point by stating, “Mapping quantities involves a trade-off between presenting the data values accurately and generalizing the values to see patterns on the map.” I think this is a central question that relates to map-making with the audience in mind. While categories are important to note and map in some cases, many occasions would better benefit from the introduction of category classes. Classes can display areas lying above or below the particular threshold in question, prompting action or study within those areas. For example, there may be several categories for average income within census tracts but sorting those categories into classes above or below the poverty level can convey more helpful information.

This chapter also details the standard classification schemes of natural breaks, quantile, equal interval, and standard deviation. It seems like the optimal scheme for a particular map depends on the qualities of the data set, such as the distribution of features and presence of outliers. 

In addition, Mitchell describes different ways to represent quantities on a map. Through graduated shapes and colors, contours, charts, and 3D models, quantities and their proportions can be displayed. There are benefits and drawbacks to each type, but ultimately, all of these methods can show where the target quantity is concentrated, and where it is not. This can inform the GIS user of where to place phenomena such as an ad campaign, a new store, or support services.

This chapter has reinforced the idea that there is no one correct way to make a map using GIS. The best way to develop a model is to simply evaluate your data sets and make multiple models to determine what works best. There is not a clear route to take…but that means there are multiple solutions!


Ogrodowski Week 1

My name is Lily Ogrodowski, and I am a first-year student from Toledo, Ohio. I’m planning on an environmental major (not sure which one yet!), but I’m also pursuing studies in Chemistry. I may also pick up Sociology/Anthropology, or even Public Health. I have a particular interest in the study of freshwater and lakes/limnology, as well as human geography issues like populations, land use, and urban planning.

Schurmann Ch. 1

In my first week of this class, I completed the introductory quiz which reinforced directives on the syllabus. Then, I read Schurmann Chapter 1, Introducing the Identities of GIS. This introductory chapter has given me a solid introduction to GIS and its uses, history, and impacts. I’ve learned that GIS is more than just digital maps—it emphasizes spatial analysis techniques. While mapping “shows” land features, it seems like applying spatial analysis takes that data and “tells” about patterns the data may reveal. With GIS, spatial analysis can be done while combining many different data sets and maps, proving that GIS is ultimately an interdisciplinary tool with uses that extend far beyond geography alone.

A main focus of the chapter is the comparing and contrasting of the two definitions of GIS: Geographic Information Systems and Geographic Information Science. The author defines GISystems as the mapping and analysis methods coded into GIS programs, while GIScience is the research and theory going on behind the scenes. GISystems are generally accepted and used, while GIScience is the ongoing research and theory development that asks questions about these systems and how they apply in different areas. GISystems are the tools, while GIScience involves taking the tools and tinkering with them.

Additionally, GIScience is most impactful when specific local knowledge is taken into consideration. In the chapter’s example of public wells being linked to cholera cases, a specific understanding of the location of focus inspires a most efficient use of GISystems, thanks to GIScience. However, because GISystems are formulated by people, that means they will inevitably have bias or limited perspectives. The chapter concludes by describing a main goal of future GIS development as involving the integration of multiple ontologies, or conceptual systems of thinking and organization within GIS.

Before reading this chapter, I don’t think I realized how prevalent GIS is in the development of our world. It makes sense that GIS models would be used in agriculture, transportation, energy, and housing, but I did not realize the extent to which GIS plans with efficiency and optimization in mind.

GIS Applications

The first GIS application I found was the Food Environment Atlas from the United States Department of Agriculture (USDA) Economic Research Services. I clicked on the Grocery data set, which shows the number of grocery stores in each county. (The darker the shade of pink means more grocery stores.) I found lots of large zones with few grocery stores or no data in the Appalachia region of Kentucky and West Virginia. (I outlined them with my computer’s Draw tool.) 

I know from research in other classes that these regions face very low income rates, and they are home to food deserts, or places with inadequate access to healthy food.

Grocery | Food Environment Atlas

Next, I found an application from the National Centers for Coastal Ocean Science (NCOOS) that forecasts harmful algal blooms in Lake Erie. I went into the archived videos to find a date with high levels of algal blooms and settled on July 25, 2023. This application is a good example of how overlaying different data sets, like cyanobacterial density and wind patterns, is what makes GIS helpful when explaining the reasons for the trends we see. 

Bloom Position Forecast – NCCOS – National Centers for Coastal Ocean Science