Wagner Week 6

Chapter 7

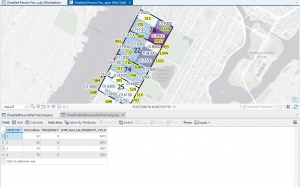
In chapter seven I started with editing, creating, and deleting polygon features. This was very straightforward and easy to understand. Moving and rotating the polygons to the correct location was actually quite enjoyable. I then used cartography tools to smooth out polygon features and make them look much nicer. I also transformed features  with a CAD drawing. I also found this section to be somewhat fun. I am proud to announce that I somehow did not have any problems in this section which has been a first for me so that’s exciting.


Chapter 8

In this chapter I learned a lot about the geocoding process which matches location fields in tabular data. In the first tutorial I geocoded data using zip codes. I built a zip code locator, geocoded data by zip code, rematched data by zip code, and then symbolized using using the collect events tool. This process was pretty quick and simple and I got it done with no issues. In the second tutorial I geocoded street addresses. I messed up the locator tool at first by forgetting a few setting to apply but the second time around I did it correctly. Other than that mistake this also went by pretty quickly.

Chapter 9

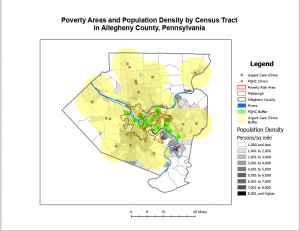
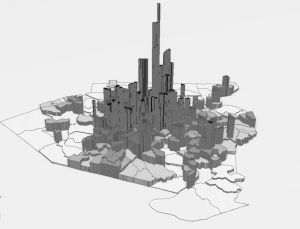
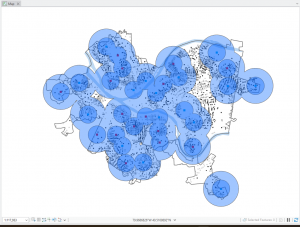
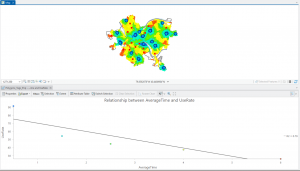
In chapter 9 I started off by learning to use buffers which I really enjoyed. I just like the way they look on the map… I then created multiple-ring service areas for calibrating a gravity model and polygons for them. This was really interesting to see travel time to pools and the colors relating to “quality” like poor or excellent. When it came to using the spatial join tool in this chapter I was struggling at first because I couldn’t find the output fields and merge rule but I think I figured it out by just clicking the specific output field and then finding a sum button. I’m not sure if that was correct but I did it anyway. I also optimally located facilities using ArcGIS Network Analyst and performed cluster analysis to explore multidimensional data. This chapter took a bit longer because of some small random problems but I got it all figured out.

Work I was supposed to start last week for Final

Zip Code- Contains all zip codes within Delaware county

Street centerline- The center of pavement of public and private roads within Delaware county. It was developed from data collected by field observation of existing address locations and by adding addresses using building permit information.

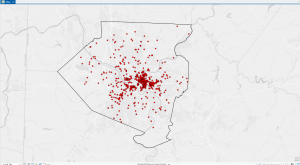
Recorded Document- points that represent recorded documents in the Delaware County Recorder’s Plat Books, Cabinet/Slides and Instruments Records which are not represented by subdivision plats that are active. (vacations, subdivisions, centerline surveys, surveys, annexations, and miscellaneous documents within Delaware County, Ohio)

Survey- a shape file of a point coverage that represents surveys of land within Delaware County, Ohio.

GPS- This dataset identifes all GPS monuments that were established in 1991 and 1997. This dataset updated on an as-needed basis, and is published monthly.

Parcel- consists of polygons that represent all cadastral parcel lines within Delaware County, Ohio.

Subdivision- consists of all subdivisions and condos recorded in the Delaware County Recorder’s office. This dataset is updated on a daily basis and is published monthly.

School Districts- all School Districts within Delaware County, Ohio.

Tax Districts- consists of all tax districts within Delaware County, Ohio. The data is defined by the Delaware County Auditor’s Real Estate Office.

Township- consists of 19 different townships that make up Delaware County, Ohio. This dataset is updated on an as-needed basis and is published monthly.

Annexation- contains Delaware County’s annexations and conforming boundaries from 1853 to present.

Address Point- a spatially accurate representation of all certified addresses within Delaware County Ohio.

PLSS-consists of all the Public Land Survey System (PLSS) polygons in both the US Military and the Virginia Military Survey Districts of Delaware County.

Condo- consists of all condominium polygons within Delaware County, Ohio that have been recorded with the Delaware County Recorders Office.

Farm Lot- consists of all the farmlots in both the US Military and the Virginia Military Survey Districts of Delaware County.

Precincts- consists of Voting Precincts within Delaware County, Ohio.

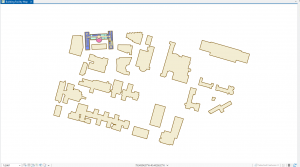
Building Outline 2023- all it says it building outline 2023

Delaware County E911 Data- For some reason this summary had the same summary as Address points and I dont think thats right.

Original Township-consists of the original boundaries of the townships in Delaware County, Ohio before tax district changes affected their shapes.

Building Outline 2021- consists of building outlines for all structures in Delaware County, Ohio. The layer was updated in 2021.

Dedicated ROW- consists of all lines that are designated Right-of-Way within Delaware County, Ohio. This data is line data that is created through the daily updates of Delaware County’s Parcel data.

Map Sheets- consists of all map sheets within Delaware County, Ohio

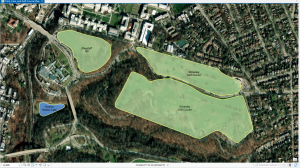
Hydrology- consists of all major waterways within Delaware County, Ohio. This data was enhanced in 2018 with LIDAR based data.

ROW- consists of all lines that are designated Right-of-Way within Delaware County, Ohio. This data is line data that is created through the daily updates of Delaware County’s Parcel data.

Address Points DXF- a spatially accurate placement of addresses within a given parcel in Delaware County.

2024 Ariel Imagery- 2024 3in Aerial Imagery. Flown Spring 2024.

Delaware County Contours- 2018 Two Foot Contours

2022 Leaf-On Imagery (SID file)- 2022 Imagery 12in Resolution

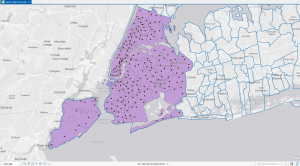
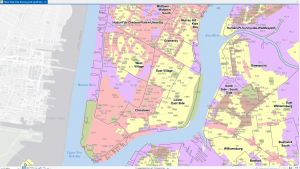
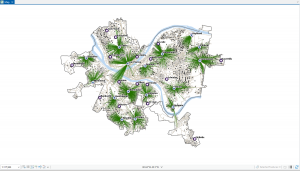
Here is my ArcGis Pro project with the Parcel, Street Centerline, and Hydrology layers. Okay so never mind I can’t find the screenshot on my hard drive but I did it and it was very purple.


Wagner Week 5

Chapter 4

In chapter 4 I learned about modifying attribute tables, carrying out attribute queries, aggregating data with spatial joins, using central point features for polygons, and creating a new table for a one-to-many join. I started this chapter off with no problems and it was pretty easy to follow along. I had troubles with 4-2 when trying to delete rows from the attribute table. An error message would pop up when I tried to save it and I even went to the website which gave me suggestions to fix it and I still couldn’t figure it out. I skipped the chapter but the next day I went back to it and somehow got it to work and finished the chapter. The rest of the chapter was interesting and took some time but I got it all figured out.

Chapter 5

Chapter 5 was about working with map projections,  coordinate systems, vector data formats, US Census maps and data tables, and finally how to download geospatial data. I enjoyed exploring the different map projections and coordinate systems to see how it affected the map. Working with the US Census maps and data tables gave me a little trouble and I ended up messing up the final product. When working with the bicyclist data between male and females I made a mistake. The data files were already supposed to be in percentage form but they were not so I must have made a mistake at some point. I did go back but I am not sure where I made a mistake. I still finished the tutorial but it wasn’t correct and I wasn’t able to see a pattern between the Male and Female bicyclists. I had a few other problems but with some quick google searches I got them figured out. I realized during this chapter that I was becoming much more familiar with where things are and the tutorials weren’t taking as long. 

Chapter 6

Chapter 6 included dissolving features, extracting and clipping features for a study area, merging features, intersecting features, using union on neighborhoods and land-use features, and Using the tabulate intersection tool. I was able to get through this chapter pretty quickly. My only problem was in tutorial 2, where I was extracting and clipping features for a study area. After I selected groups by area, I was supposed to select the remaining block groups with the selection tool but every time I tried It would deselect the other groups. I had to redo the whole process multiple times and I still couldn’t figure it out so I had to move on. By the end of this week I feel more comfortable with the interface but there is still a lot that confuses me.

Wagner Week 4

Chapter 1

Before even starting chapter 1, I was confused using the hard drive and transferring files but I figured it out after many mistakes. Going in I felt lost but the instructions are pretty clear and I felt better about a lot of basics. It did take me a while to try and navigate where things are and I assume it will just get easier with repetition throughout the semester. This first chapter took me longer to get through  but I think that is to be expected for any first time. I really liked the end of the chapter getting to see the 3-D map to show differences in population density.


Chapter 2

In chapter two I got to design and symbolize thematic maps. I enjoy every time I get to go to the symbology panel and change the symbols and colors. I find it fun but also it’s cool to see the changes on the map to make patterns more visible. This chapter had a lot to it, but it felt mostly straightforward. I again took a while to navigate where things are and clicked around a bunch to find specific buttons. I thought the 2-6 tutorial was really interesting when I got to swipe over the map and could compare two sets of data. I can see how helpful this software is in the real world. The only problem in this chapter was the 2.4 tutorial data was corrupt so I had to skip over it.


Chapter 3

Chapter 3 was all about sharing the maps we make for people who may not have access to ArcGIS Pro or don’t have the skills. I really enjoyed building the 3.1 layout because I like to make posters and such. I had no problems here and liked the finished product. Sharing the maps to ArcGIS online was also pretty easy and straightforward. Creating a story map was also fun, it just took a while. It just took time copying and pasting the correct paragraphs over to the story map. My little problem was that I couldn’t find an option to change the writing style to subheading so I just picked heading 2 or 3  and it seemed to do the job. Tutorial 3.4, creating the dashboard, started off really well for me but then I ran into some issues. For some reason I was having the hardest time to get the map next to the table. When I was supposed to drag the map to the left of the table, it just wasn’t going anywhere. I tried for a while to figure it out but decided it was best to move on. Later on, I also couldn’t find the expand button in the top corner of the map and so I wasn’t able to finish a few steps at the very end of the chapter. My dashboard doesn’t look the way It is supposed to but I tried.

Wagner- Week 3

Chapter 4

The first section asked the question: why map density? Mapping density will show the concentration of features on a map. It is helpful when searching for a pattern rather than specific locations of features. Density maps use areal units that will clearly show the distribution.  The next section is on deciding what to map. You need to think about the features you’re mapping and the information you need from the map. If you want to map the density of points or lines you will typically use a density surface. If you have data that has already been summarized then you map it using defined areas.You also need to decide if you want to map features or the feature values because it can affect the patterns in the data. Section 3 focuses on the two ways of mapping density: based on features summarized by a defined area or by creating a density surface. When mapping by a defined area you can map density graphically, using a dot map, or by calculating a density value for each area. A density surface is created as a raster layer and each cell in the layer gets a density value. It then focuses on mapping density for defined areas. You can calculate a density value for defined areas based on the areal extent of each polygon or you can create a dot density map based on the total count or amount and then specify how much each dot represents. The last section is about creating a density surface. You will specify call size, search radius, calculation method, and units, all which affect how the GIS calculates the density. The cell size determines how coarse or fine the patterns appear and the search radius will determine how generalized the patterns will be, there are two calculation methods, and you can specify what kind of areal units you want the density to be calculated in. You can also display a density surface using either graduated colors or contours. 

Chapter 5

Chapter 5 was about finding what’s inside.  It is useful to map what’s inside an area to see what is happening there or to compare it to other insides of areas. You first need to determine if you are finding what’s inside a single area or each of many areas, if the features are continuous or discrete, what kind of information you need from the analysis, and if you need to see features that are completely or partially inside. What I have noticed is that there are always a lot of beginning steps and decisions when it comes to deciding how to map and analyze. You can find what’s inside by drawing areas and features, selecting the features inside the area, or overlaying the areas and features. By drawing areas and features you can simply look at what features are inside or outside the area. You can see which discrete and continuous features are inside the areas depending on what data you have. When you select features inside the area the GIS checks if each feature is inside the area and then flags the ones that are. Overlaying areas and features is more complex and finds which discrete features are inside certain areas and summarizes them, calculates the amount of each continuous category or class inside one or more areas, or summarizes continuous values inside one or more areas. Reading about all of these methods feels confusing and I think I would need to do it in order to understand it more. I am ready to actually use the software and see some of these processes actually happen. 


Chapter 6

Chapter 6 is about mapping what’s nearby. By mapping what’s nearby, you can find out how and event or activity affects an area and features inside of it. There are yet again a million different questions you need to answer in order to determine how you map and analyze your data. To identify what is nearby you can use: straight line distance(Defining an area of influence around a feature, and creating a boundary or selecting features within the distance) , distance or cost over a network(Measuring travel over a fixed infrastructure) , or cost over a surface(Measuring overland travel and calculating how much area is within the travel range). You can use straight line distance by creating a buffer to define a boundary and what is inside it, select features to find features within a given distance, calculate feature-to-feature distance to find and assign distance to locations near a source, or create a distance surface to calculate continuous distance from a source. When measuring distance or cost over a network, GIS identifies all the lines within a network and you can then find features around the area. When calculating cost over a geographic surface, GIS creates a raster layer where the value of each cell is the total travel cost from the nearest source cell. Again, I read all of this information and it feels like a lot but I am excited to see what I can do and learn from using the software next week. 

Wagner Week 2

Chapter 1 

In the first chapter, it focused on what GIS is,  all the things it can do, and some basic GIS concepts. GIS analysis is looking for geographic patterns in data and at relationships between features. The first section describes the steps in the process of GIS analysis. It starts with framing a question to understand what type of data you need. This question will help frame the rest of the process. The next step is to understand your data, which this chapter really focuses on. The book explains that you have to know what kind of data you have in order to know what you need to create. The rest of the process is: choose a method, process the data, and look at the results. This little section made me realize the importance of understanding the basics and what you have in order to begin the process of GIS analysis. The chapter then focuses on understanding geographic features and attributes. It gives definitions of types of features, the ways they are represented, and information about map projections and coordinate systems. When it comes to map projections and coordinate systems, the book mentions that all the data layers should be in the same map projection and coordinate system to make sure results are accurate. The last section explains selecting, calculating, and summarizing when working with data tables.  

Definitions

discrete features–  actual location can be pinpointed

continuous phenomena– can be found anywhere and blanket the entire area that you’re mapping

features summarized by area-  represents counts or density of features in an area’s boundaries. 

Vector Model- feature is a row in a table, feature shapes are defined by x,y locations, points/lines, areas are defined by borders and are closed polygons

Raster Model- features are represented as a matrix of cells in continuous space, each layer represents an attribute 

Categories- groups similar features

Ranks- put features in order, from high to low, used when direct measures are difficult or the quantity represents a combo of factors

Counts and Amounts- count= actual number of features, amount= any measurable quantity associated with a feature

Ratios- relationship between two quantities, are created by dividing one quantity by another for each feature


Chapter 2

Chapter 2 starts off with explaining that there is a lot of helpful information that we gain from mapping. We can see patterns, areas that we need to take action in, and areas that meet our criteria. In order to look for patterns in your data, you have to decide what you are going to map. You also have to take into account the audience and issue that you are addressing when making a map. This is an aspect I hadn’t thought about when using GIS and showing the data. There is a lot of information and the correct presentation is important. The next section is about preparing your data. It states the importance of assigning geographic coordinates and assigning category values. The biggest section in this chapter is about actually making the map. To map a single type, you tell GIS to draw all features using the same symbol. It explains how GIS stores each feature as a coordinate pair to define its shape. You can also map a subset of features in order to reveal any other patterns you might have been missing. You can also map by category and subsets of categories, and use different symbols for each one. It is important to not show more than 7 categories and to have large bordering ones because it will become difficult to see the pattern. If you do have more than 7 categories, grouping them together can be helpful for the patterns to stay visible. It’s important to understand what the categories represent and to group them in a specific way depending on what you are trying to show. The book then explains 3 ways to categorize data. It also states the importance of picking symbols to display categories and mapping reference features. The final section is all about analyzing the patterns. What I’ve taken away from this chapter is how important it is to make sure the pattern can be visible while making your map. There are a lot of choices to be made in order to represent the data in a way that a pattern can be seen and understood. 


Definitions 

Single Type Mapall features use the same symbol

Grouping Categoriesgrouping similar categories together to make the pattern  easier to see


Chapter 3

Chapter 3 focuses on mapping the most and least. To do this, you map features based on a quantity associated with most and then with least. The book goes over some terms that we already learned in chapter 1 and applies them to mapping most and least. It talks about using classes to group features with similar values together. It goes over 4 common standard classification schemes to class data together which are: natural breaks, quantile, equal interval, and standard deviation. I enjoyed reading the section with how each scheme works, what they are good for, and their disadvantages. You first must choose a scheme, then decide on how many classes you will have, and then adjust to make the classes easiest to read. This chapter also includes a very large section on making the map. GIS gives you these options to show quantities: graduated symbols, graduated colors, charts, contours, and 3D perspective views. You have to consider your data and features and then pick an option accordingly. I was intrigued by the 3D perspective view and how you have to change the viewing position, pick a specific z-factor, and consider the light source. It seems a little difficult to me but I love that you can do all of that using GIS in order to show data in a better way. This chapter ends with looking for patterns in the highest and lowest values.  Overall I hadn’t thought about the mapping of most and least and all the relationships that the data could reveal, so I enjoyed learning all you can do with it. 


Definitions 

Classes- groups features with similar values together 

Natural Breaks- based on natural groupings of data values

Quantile- Each class contains an equal number of features

Equal Interval-The difference between the high and low values is the same for every class

Standard Deviation- based on how much their values vary from the mean

Graduated symbols- used to show the volumes or ranks for linear networks

Graduated colors- to map discrete areas, data summarized by area, or continuous phenomena

Charts- to map data summarized by area, or discrete locations or areas

Contour lines- to show the rate of change in values across an area for spatially continuous phenomena

3D perspective view- most often used with continuous phenomena to help people visualize the surface

Wagner Week 1

My name is Hannah Wagner and I am a sophomore majoring in environmental science.

I first took the syllabus quiz and then read the text which was an introduction to GIS and its history as well as its uses. I found this whole reading to be very interesting and educating because I wasn’t really sure what GIS was and what it was used for. I understood the basics more when it was explained that in the past Ian McHarg had layered tracing paper with different parts of the landscape in order to see where a highway would cause the least amount of disturbance to the environment. I assumed GIS was just simple maps but I was unaware of the “layering” that gives much more data about the location. I was shocked to learn how many industries use GIS to make spatial decisions, especially when those decisions affect everyday life. I was really interested in learning how business farmers were using GIS to decide the best places to plant crops due to their distance to markets and even to understand why a section of crops may have a disease.  I was also very interested in “the two faces of GIS”, GISystems and GIScience.  I understood it as GISystems is straight forward, the process of gathering data, inputting it, analyzing it, and creating a map all with the given technology. GIScience is the side that questions the technology and digs deeper to find the best ways to represent data. I appreciate the GIScience side that doesn’t blindly trust the code to create the best and most accurate representation. I also found it very interesting that people can perceive information from visual displays easier than a data set or table. This makes total sense to me because I can understand data much better when it is visual and it can help me connect relationships between data much easier.

I have always been interested in agriculture and its relationship to the environment so I was excited to find a map related to agriculture.  I found a website showing lots of different ways GIS is used in precision agriculture mapping.  I picked a map that assesses vegetation.

https://www.satimagingcorp.com/services/geographic-information-systems/gis-maps-agriculture-mapping/

I also looked up GIS application in air quality and found a pretty neat visual that combined different data.

https://www.esri.com/arcgis-blog/products/arcgis-living-atlas/health/air-quality-aware