Mitchell Chapter 1 – Introducing GIS Analysis –
What is GIS Analysis? – GIS analysis is a process for looking at geographic patterns in your data and at relationships between features. The actual methods you use can be very simple—sometimes, just by making a map you’re doing analysis—or more complex, involving models that mimic the real world by combining many data layers. The chapters in this book follow the process you go through when performing an analysis. You start your analysis by figuring out what information you need, this can usually be started with a question. Being specific with the question will make the analysis easier in the end. The type of data and features that you use help determine what method you should go with. There are often multiple different methods to getting your data, one usually being faster or more efficient than the others. Once you’ve selected your method, you then use a GIS to interpret your data. The last step is to interpret your results, they can support or deny what you previously thought as well as give a better insight to your topic of choice.
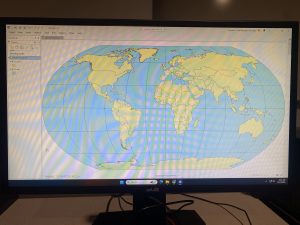
Understanding Geographic Features – The type of geographic features you’re working with affect all steps of the analysis process. Spending some time up front looking at your data—and figuring out how it can be analyzed—will make the process run smoothly. There are three main feature types: discrete, continuous phenomena, or summarized by area. For discrete locations and lines, the actual location can be pinpointed. At any given spot, the feature is either present or not. Continuous phenomena such as precipitation or temperature can be found or measured anywhere. These phenomena blanket the entire area you’re mapping—there are no gaps. You can determine a value (annual precipitation in inches or average monthly temperature in degrees) at any given location. Continuous phenomena often start out as sample points, the GIS then uses these points to assign values between the points, an example could be a weather map. Continuous data can also be data that is enclosed by boundaries, such as county or state lines. Features summarized by area are summarized data that represents the counts or density of individual features within area boundaries, an example would be the total number of households in a county.
Understanding Geographic Attributes – There are five main types of attribute values: categories, ranks, counts, amounts, and ratios. Categories are groups of similar things. They help you organize and make sense of your data. Ranks put features in order, from high to low. Ranks are used when direct measures are difficult or if the quantity represents a combination of factors. Counts and amounts show you total numbers. A count is the actual number of features on a map. Ratios show you the relationship between two quantities and are created by dividing one quantity by another for each feature.
Mitchell Chapter 2 – Mapping Where Things Are –
Why map where things are? – By mapping things, we can now look at the picture as a whole, rater than looking at one item at a time, this helps us to pick out pattern and/or correlation between parts of the map. By looking at the locations of the features, you can begin to explore the causes for the patterns you see.
Deciding what to map – To look for geographic patterns in your data, you need to collect all data that you possibly can and then you can filter and sort and overlay exactly what layers and items or locations you want to compare on your map. you can use these “layers” to compare and see what type of event, or thing occurs in the same space or vicinity as anything thing you are looking at. The map should be appropriate to the audience, so it should be user friendly, and it should also be appropriate for the issue or topic being addressed. An audience that is unfamiliar with the area or the data being mapped will want to see information that provides reference locations, such as roads, lakes, or administrative boundaries. The way that the map is presented will also affect how much information you are able to show. Small maps such as one that will be in a journal should only show the imperative information, while larger maps are able to show more information that maybe is not quite as important.
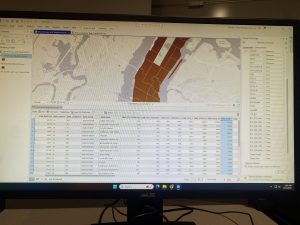
Preparing your data – Before creating your map, make sure the features you’re mapping have geographic coordinates assigned and, optionally, have a category attribute with a value for each feature. Each feature needs a geographic location in coordinates, as well as a code to determine its type, such as whether a crime is an assault, theft or burglary.
Making your map – To create your map, you tell GIS what features you would like to display and what symbol to use for them, you can map them all as a single type or layer, or you can make sure that they all are assigned their correct code value. The GIS stores the location of each feature as a pair of geographic coordinates or as a set of coordinate pairs that define its shape (line or area). When you make a map, the GIS uses the coordinates to draw the features, using a symbol you specify. For individual locations, such as customer addresses, the GIS draws a symbol at the point defined by the coordinates for each address. For linear features, such as streets, the GIS draws lines to connect the points that define the shape of each street. For areas, such as parcels of land, the GIS draws their outlines or fills them in with a color or pattern.
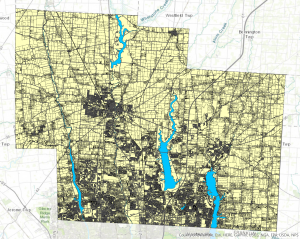
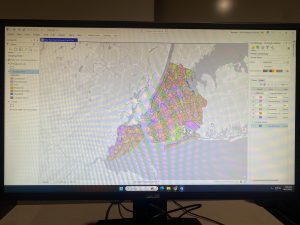
Analyzing geographic patterns – If your map presents the information clearly, you may be able to see some patterns in the data. If you’re mapping a single category, you may see that features appear to be clustered, uniformly spaced, or randomly distributed. The patterns partly depend on the scale of the map. By zooming in or out, you may see patterns that were not evident before. Based on what you know about a place, or similar places, you may discover that the patterns are meaningful. This map of parcels shows the development pattern common to many towns: a central commercial strip abutted by manufacturing and multifamily housing, with single-family housing around the edges, and beyond that, agriculture. You can begin to understand how the town developed and where it might grow.
Mitchell Chapter 3 – Mapping the Most and Least –
Why map the most and least? – By mapping the most and the least, you gain deeper insight into patterns across point, line, or area features (introduced in chapter one). The chapter emphasizes defining your map’s purpose and tailoring it to your audiences knowledge. With GIS, you can both explore data to uncover patterns and present maps that tell as story or answer questions.
What do you need to map? – The way that you display your data depands on the feature type, discrete features often use graduated symbols or shading, while summarized data is typically shown with shaded areas or charts. Sometimes you have to dive deep to discover patterns, only to dumb it back down to a generalized map or table to highlight the key trends or important factors of the topic, also to be Able to answer the big question or problem.
Understanding quantities – Quantities can be counts or amounts, ratios, or ranks. Knowing the type of quantities you’re mapping will help you decide the best way to present the data. Counts and amounts show you total numbers. A count is the actual number of features on the map. An amount is the total of a value associated with each feature. Using a count or an amount lets you see the value of each feature as well as its magnitude compared with other features. Ratios show you the relationship between two quantities, and are created by dividing one quantity by another, for each feature. Using ratios evens out differences between large and small areas, or areas with many features and those with few, so the map more accurately shows the distribution of features. Because of this, ratios are particularly useful when summarizing by area. Ranks put features in order, from high to low. They show relative values rather than measured values. Ranks are useful when direct measures are difficult or if the quantity represents a combination of factors. For example, it’s hard to quantify the scenic value of a stream. You may be able to state, however, that the section that passes through a mountain gorge has a higher scenic value than the section passing near a dairy farm.
Creating classes – Classes group features with similar values using the same symbol, and they can be created manually or through classification schemes: Natural Breaks highlights inherent groupings in uneven data; Quantile assigns an equal number of features to each class; Equal interval divides data into equal ranges, making it beginner-friendly; and standard deviation classifies values based on their distance from the mean.
Making a map – When mapping quantities, you can choose from several display methods: Graduated symbols for discrete points, lines, or areas; graduated colors for areas, summarized data, or continuous phenomena; charts to show both quantities and categories for areas or locations; contour lines to illustrate changes across continuous surfaces; and 3D perspective views to visualize continuous phenomena as surfaces.
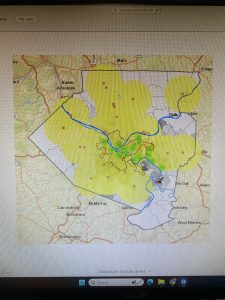
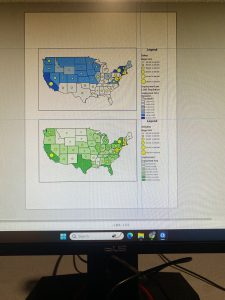
Looking for patterns – If your map presents the information clearly, you can compare different parts of the map to see where the highest and lowest values are. Looking at the transition between where the least and most are (for example, seeing where change is rapid or gradual) can give you further insight into relationships between places. You’ll want to see whether values cluster or are evenly distributed. In this map, the Asian-American population is clustered in three areas. A store owner selling to this population would focus on these areas for an ad campaign.