GIS Tutorial for ArcGIS Pro: Chapter 7
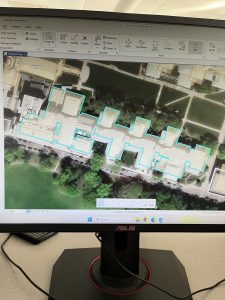
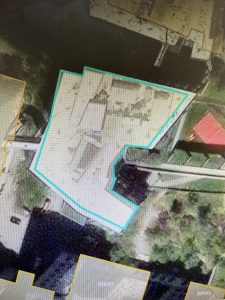
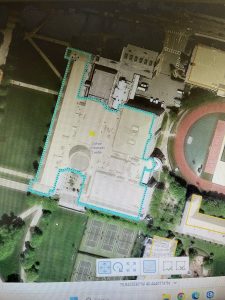
Chapter 7 focuses a lot on how to create, move, and edit different shapes, features, and buildings. The part that I enjoyed learning about the most was how to move the vertices on different buildings, and how to construct them in a way that makes a new shape. Going through Tutorial 7-1 was a little confusing at first because it had me using some new tools that I hadn’t used before. It focused on doing renovations for a new and improved campus center on a college campus.
Tutorial 7-1 had me working through different polygons, cartography tools, and learning how to spatially adjust different features. Like I mentioned before, it was a little confusing to me at first. One of the main questions I had coming out of this chapter was physically selecting the buildings for rotating/moving the polygons. I think I messed up somewhere along the way because it just kept making the whole building blue when I clicked on it. I basically just had to retrace my steps through that part of the process and then it worked. After that, learning about how to move features and split the buildings was neat! I liked using the Geoprocessing tools and the Attribute Tables in order to change different aspects of the map.
The tutorials continued with learning how to use the different cartography tools, creating physical polygon features on a map, and viewing layers on a CAD drawing. I liked how this chapter used a lot of different tools and taught me how to search for different things as well. The World Imagery database was also cool to look at; I liked how it showed the buildings on CMU’s campus as transparent. I think the part I found most useful about this chapter was the cartography tools, and I think that I will be using those on my final project. I have attached three screenshots of my work throughout this chapter.
GIS Tutorial for ArcGIS Pro: Chapter 8
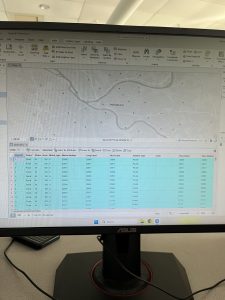
Moving on through Chapter 8 showed me that I had to read the beginning of the chapter slowly in order to comprehend everything. There was a lot of data and information that we had to go through, and reading the beginning part was especially helpful for this particular chapter. The tutorials themselves did not take long, but there was a lot to understand beforehand. I do think knowing about streets and addresses from the previous chapters definitely helped my understanding. For these tutorials, we focused on different Pennsylvania zip codes and addresses, and how to manipulate them using the Create Locator tool.
Tutorial 8-1 had a lot of emphasis on sorting by zip code based on an arts event. I liked this part of the chapter because it allowed me to fix the data on the Create Locator tool. This tool became incredibly useful, and I liked how I was able to do the “Your Turn” and experiment with it. I do think that I had issues with sorting the Status on the Attribute Table, because I did not get the same results at first. However, I was able to go back and fix it pretty easily. The Matched and Unmatched areas were slightly hard to understand and work with for me. The collecting events went well and I thought that was neat!
This chapter had me doing a lot of different data analyses with a lot of different tools. I liked that because I feel like I have a good grasp on where everything is located, which will be helpful for my future project. Matching the street numbers and addresses was useful, but I do not think I will end up needing that for my project. I am interested in how we can create different layers, colors, and still be able to see the data through those things. We have already covered this in different chapters, but it’s one of the things I am most interested in. I have attached screenshots of my work throughout this chapter.
GIS Tutorial for ArcGIS Pro: Chapter 9
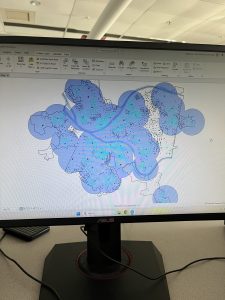
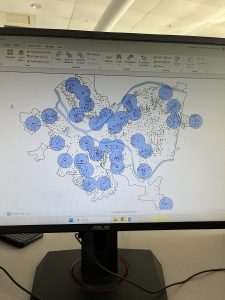
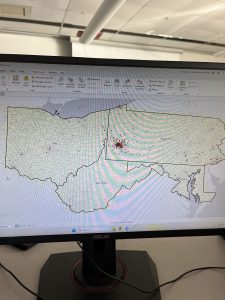
I’m going to be honest here, I thought the buffers were so cool. I loved making them bigger or smaller depending on what radius was needed, and it was just very neat to see on the map. ArcGIS Network Analysis was the biggest aspect I took away from this chapter, because it allowed me to locate facilities without too much extra work. I also liked how these tutorials were not super long, but they were definitely in-depth and showed me how to use the tools needed. It also gave me a good idea of how I could go back and re-do my work if needed.
Tutorial 9-1 and 9-2 were my favorites out of this chapter. Like I said, I enjoyed looking at the buffers and how they were affected by different data. However, a big question I had throughout this involved the ages of the pool use. I am just curious to know what the map would look like with maybe a different range, or even with a different data set. It would definitely be different for adults, and I was thinking about my project while using this tool. I would be able to use this for any kind of wildlife hotspot, depending on what I plan to create. We also had to use the Select By Location tool, which I used in chapter 7 as well to select the polygons on different buildings. I had a little trouble selecting the actual features because I clicked in the wrong place.
Overall, I think this chapter was the most fun and useful for me. It was neat in Tutorial 9-3 that I was able to look at the different travel times and examine which ones were ideal or not. The Properties feature on each map has been very useful, and I feel like we spend a lot of time using those tools. It also taught me how to make graphs based on maps and tables, while using the Network Analysis tool. The Your Turn sections are useful because they actually allow me to try it with minimal instruction! Overall, this section wasn’t too confusing and I enjoyed it. I have attached screenshots of my work throughout this chapter.