Chapter 1:
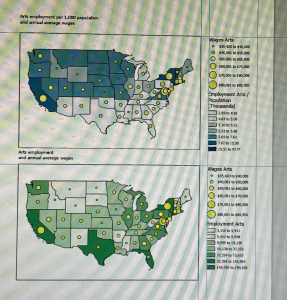
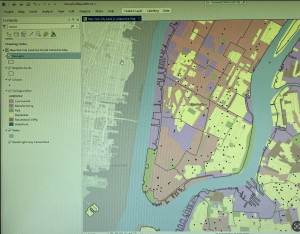
The previous book we read through by Mitchell did a decent job at preparing students for the actual GIS system tutorial manual. However, doing things hands-on has enabled me to better understand certain aspects of GIS. I’m not very tech-oriented, so I knew that adjusting to things like saving files correctly and typing on the new keyboard would be a hurdle for me. However, following the instructions laid out within the manual was not as difficult as I thought it would be. Each chapter is separated into different tutorial sections that teach different aspects of ArcGIS. Each section also has a designated file you work on. In Chapter 1, these different sections are as listed: Tutorial 1-1 Getting an overview of ArcGIS Pro, Tutorial 1-2 Navigating ArcGIS Pro, Tutorial 1-3 Working with attribute data, and Tutorial 1-4 Symbolizing maps. For Tutorial 1-1, we learned how to open an ArcGIS Pro project and navigate the ArcGIS Pro interface, including understanding basic GIS concepts along with navigating the map and its layers. For example, this section introduced bookmarks, which were helpful to understand for future chapters. It also showed us how to turn layers on and off, as well as re-order layers within the contents pane. Tutorial 1-2 taught us how to correctly use a pop-up window, as well as how to search for a feature. Tutorial 1-3 was also helpful as it showed us how to work with attribute data through editing the data within the fields view of the table, and how to use tools to obtain summary statistics. Lastly, Tutorial 1-4 delves into how to interact with feature classes through adding/ removing them, giving them symbols, and giving them labels. Question: Which skills from Chapter 1 will be used most frequently throughout the rest of my learning how to use ArcGIS Pro?
Picture: Tutorial 1-1
Picture: Tutorial 1-3
Chapter 2:
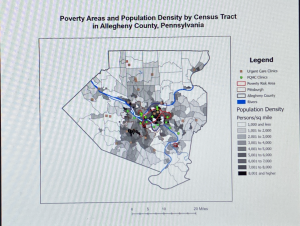
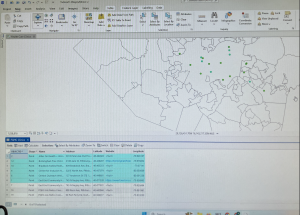
Throughout the various tutorials, I liked how for more precise sets of instructions, they gave us “your turn” assignments where we repeated the previous task again, but in a different way. It allowed me to better remember and understand what I had done previously. As stated previously, each chapter is separated into different tutorial sections that teach different aspects of ArcGIS. Chapter two is focused on map design, with it being separated into the following sections: Tutorial 2-1 Symbolizing qualitative attributes, Tutorial 2-2 Labeling features and configuring pop-ups, Tutorial 2-3 Filtering with definition queries, Tutorial 2-4 Creating choropleth maps for quantitative attributes, Tutorial 2-5 Displaying data using graduated and proportional point symbols, Tutorial 2-6 Normalizing population maps with custom scales, Tutorial 2-7 Creating a dot density map, and finally Tutorial 2-8 Setting visibility ranges. I won’t go into too much detail of every individual tutorial section, as the titles are somewhat self-explanatory. However, I will share some experiences. In Tutorial 2-5, I remember accidentally renaming the wrong layer and editing on top of features that should’ve been displayed alongside my edits. I understood what mistake I made in order not to repeat it in the future. Also, changing the symbology of a layer/feature is something that was done in almost every section of Chapter 2. It really familiarized me with how to change the color and size of a symbol. The same occurred with renaming layers within the contents pane, as I now feel familiar with the action. I also became much faster at opening and naming files in chapter 2 as I had repeated the action many times over. Question: How do we decide which symbology method to choose? I did not understand the different methods in relation to the numbers they visually display.
Photo: Tutorial 2-4
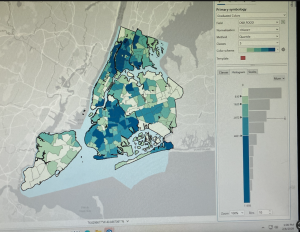
Photo: Tutorial 2-8
Chapter 3:
Chapter 3 is less focused on how to make the maps and more focused on how to share these maps with individuals who don’t have ArcGIS Pro or any GIS skills. It also takes you off the ArcGIS programming platform and onto the ArcGIS Online website to show various methods of sharing maps on ArcGIS Online. Because of this, chapter 3 is not structured like chapters 1 and 2, with each tutorial section correlating with a designated ArcGIS file. Instead, it has ArcGIS file tutorials for within the program and outside the program. With the tutorials that were within the program being Tutorial 3-1 Building layouts and charts, and Tutorial 3-2 Sharing maps online. Sections that described how to perform actions within ArcGIS online were sections Tutorial 3-3 Creating a story and a briefing in ArcGIS StoryMaps, and Tutorial 3-4 Creating a dashboard in ArcGIS Dashboards. I struggled the most with this chapter because the instructions for what actions to perform for the ArcGIS online sections seemed to be outdated, with instruction names sometimes not correlating with the names on my screen. I also just struggled in general with jumping to a semi-new platform after being on ArcGIS Pro for two introductory chapters. I feel they could have introduced ArcGIS Online in later chapters. In the Tutorial 3-1 section, we were taught how to build a layout for our maps and charts. It reminded me of doing graphic design, with having to place images within select measured areas using various tools. The Tutorial 3-2 section was fairly simplistic, with it teaching how to properly adjust settings in order to publicly share a map within ArcGIS Pro. This is when the chapter introduced ArcGIS online, as we adjusted this shared map within the online program. Tutorial section 3-3 showed how to create a story and a briefing within ArcGIS online, both of which are streamlined ways for others to view and interact with your GIS map/data. Tutorial section 3-4 taught something similar, showing us how to create a Dashboard, creating another way to clearly outline and visualize our data within the platform. Question: When using ArcGIS online, what is the purpose of sharing/creating a story vs a briefing? What purposes do each hold?
Picture: Tutorial 3-1