Chapter 7. 7-1. This chapter focuses on polygon data, such as how to make and edit polygons. To move an existing polygon, use the select tool, then go to the edit tap and select move, you can then freely move the polygon around, when it’s in the correct position click the green checkmark. To edit an existing polygon shape use the edit vertices button under the edit tab, then add points where you want to make changes then drag the highlighted areas to create the desired shape. To split a polygon use the split tool.
7-2. This section teaches us how to create and delete polygon features. To create a polygon use the create feature class tool, and select polygon as the geometry type. To draw the polygon, go to the edit tab and select create and then the layer you want to work with. Using the line function draw the outline of the polygon and double click the last vertices to finish drawing the polygon. To make a polygon transparent select the layer then click feature layer and then in the effects group type in your desired transparency level. As you create polygons it is automatically added into the attribute table for that layer. To delete polygons, use the select feature, click on a polygon and then use the delete button in the edit tab. To snap a polygon to something such as a street use the snap function in the edit tab and then click create to make a polygon.
7-3. This chapter is about using cartography tools. We used the smooth polygon tool to take away the edges on a polygon.
7-4. CAD’s or computer aided drawings are often used in conjunction with GIS to display where something is and the interior of it, such as an academic building. CAD drawings cannot be edited directly so the data needs to be exported as a feature class. The new layer that was created converted polygon data to polyline, so the apply symbology from layer tool to import symbology to the polylines. To select the whole CAD layer, right click the feature in the contents pane, then go to selection, and select all. To merge the CAD layer to the actual feature layer, use the modify button in the edit tab. Then select Similarity 2D, then add new links. You then add points on the corners of the CAD layer and then on the corresponding concerns of the actual layer. Then when you are done click transform in the modify features pane.
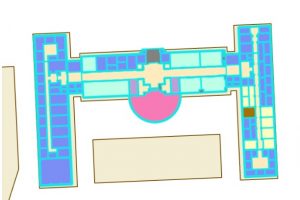
CAD layer on top of the actual feature layer.
Chapter 8. 8-1. This chapter is about using geocode data. This is in essence features that have been assigned a name or value by a human, it is then matched with data that is present online or from a database. To start creating a geocode of zip codes, use the create locator tool, and import your data, select zip for the role, then for *ZIP select GEIOID10. This creates a locator in the catalog pane. To turn it into a geocode find the locator in the catalog pane, right click it and go to properties, then geocoding options, then match options. Use the geocode address tool to create addresses using your locator, this generates points on the map. To rematch data, you can go to data for the layer, then click rematch. The collect events tool is useful for counting the number of features in a layer and generating graduated symbols for said feature.
8-2. When using a geolocator, it is possible to alter the accuracy of the algorithm. In this section we set the min and max values for accuracy to be 10. This resulted in points with low accuracy.
Chapter 9. 9-1. Chapter 9 focuses on spatial analysis tools. In section one we learned how to use buffers, which is just a polygon surrounding a map feature. To create a buffer around point data use the pairwise buffer tool, then if you want the output features to all be in the same layer set the dissolve type to be into a single feature. To calculate the frequency of points within a buffer select features that intersect the buffers and then calculate the summary of a field within the data table for your class of interest.
9-2. To create multi-layered rings, use the multipole ring buffer tool, and input your set distances. To measure data within those rings, use the spatial join feature so that the data from one layer can be summarized in the rings.
9-3. To determine distance as a function of time in arcpro, create a workflow. This is done by selecting the attributes you wish to work with, then in the analysis tab clicking on workflows, then network analysis, and service area. Once this is done select the class you wish to work with, in our case it was Facilities, then click on the service area layer ribbon, then in the travel settings select towards facility for direction. The cutoffs section is for the travel time. Click the run button on the left side of the tab to run your analysis.
9-4. This section teaches us how to use a network to create a model to show which public pools are located so that they achieve the optimal amount of attendance within a given range. This is done by creating location allocation in the network analysis tab. Then in the data group import the facilities that are going to be used, then import demand points. The demand points are essentially people that can potentially use the pool, this is how the model will draw lines later. In the travel settings group, select towards the destination for direction, then include the number of facilities you have in the facilities group. Once all information is entered, click run model (it also helps to hide the demand points).
9-5. Performing cluster analysis. Using the multivariate cluster tool, we are able to perform cluster analysis using multiple variables.
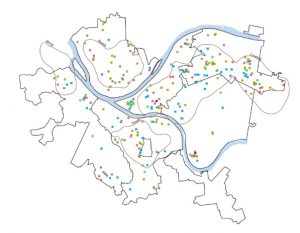
Multivariable analysis of age of arrested individuals