Hollinger Week 5
Chapter 10:
Reading Notes:
- This chapter was about working with rasters, and overall, I would say it was the chapter with content that felt the most familiar to me outside of the ones covering basic scripting techniques.
- There are only a handful of tools available in arcpy.ia that are not available in arcpy.sa. It is good practice to use the arcpy.sa module when using tools common to both modules.
- BandCount will determine if the raster is a single or multi-band.
- Raster Calculator is one of the few geoprocessing tools not available in ArcPy since you can write expressions right into the script.
- 6 Neighborhood objects: Annulus (ringlike), Circle, Irregular, Rectangle, Wedge, Weight
- NumPyArrayToRaster() and RasterToNumPyArray() can convert rasters to NumPy arrays and vice versa. Some functions in the da module work with NumPy arrays.
Answers to Review Questions:
- A raster object is a raster class that references a raster dataset created by referencing an existing raster on disk, running a geoprocessing tool, or using a map algebra statement. Geoprocessing operations and map algebra expressions result in temporary outputs because raster workflows often require multiple steps, so temporary outputs allow for lower storage requirements as rasters for intermediate steps do not need to be saved.
- Tools common to both the sa and ia modules are tools for map algebra, overlay, image classification, and statistical analysis. Spatial Analyst alone includes general raster analysis tools and more domain-specific tools. Image Analyst alone includes tools for deep learning and motion imagery analysis.
- A raster dataset is a data model stored on disk or in a geodatabase that can be single or multi-band. A raster band is only one layer in the raster dataset with values for a specific range in the EM spectrum. Raster datasets come in a TIFF, JPEG, etc., whereas raster bands have the property of cell size. All properties can be accessed using either Describe() or da.Describe(). Bandcount, compressionType, format, permanent, and sensorType properties are unique to raster datasets vs raster bands.
- Map algebra statements can be preferred over geoprocessing tools because the expressions can be short, but also used for more elaborate statements.
- You can use map algebra in Python to identify certain areas of elevation in a raster or perform mathematical operations with rasters, including conversions, for a few examples. However, some of the tools in the math toolset do not have an equivalent math algebra operator.
- In order to carry out reclassification, you need to create a remap table. You can do this using the RemapValue function and giving it the remapTable object as a parameter. The object created using the RemapValue function can then be used as a parameter in Reclassify(). As an alternative to this method, you can also use a RemapRange object to remap a range of values instead of individual values.
- Raster Cell Iterator reads each individual cell using an indexed location, which is different from geoprocessing tools, which typically process the entire raster without inspection of each individual cell. You can use RCI to assign values to specific cells, create empty rasters, and handle NoData values.
- Raster functions in ArcGIS Pro are applied directly to the cells of raster datasets without writing a new raster to disk, which is different from their sa and ia equivalents, which write results to disk as new raster datasets.
Chapter 11
Reading Notes:
- The ArcGISProject object uses the save() and saveACopy() methods. SaveACopy is the same thing as Save AS.
- Setting an environment will not work unless it is within the same folder as the .aprx file.
- Using the ArcPy mp module, you cannot create a new project, create new layouts, elements, or reports.
- You can use supports() to determine if a layer supports a certain property.
- Only text and pictures can be modified in a layout, not the actual content.
- You can also access the Cartographic Information Model (CIM) in Python, which is used to document cartographic descriptions of GIS datasets.
Answers to Review Questions:
- In order to determine the contents of a project in ArcGIS Pro, you can use methods like listLayouts(), listMaps(), and listReports() for a few examples. You often create an object and then use one of these list methods on said object as is appropriate.
- Layer properties like adding basemaps, adding data from a path, adding a layer, inserting a layer, moving a layer, and removing a layer are all methods that can be used to directly change the properties of a layer in the mp module. You can also read and write properties like brightness, contrast, show labels, symbology, transparency, and visible.
- In order to reference a layer in one map and add it to another in the same project, you need to first have a parameter of a Layer object, which is an existing layer in the map you wish to add to. Then you will need to create another layer object or LayerFile, which is the layer to be added. Then you finally need a string that will specify whether your referenced layer should be added before or after your first layer object.
- A Layer object is a layer that is already a part of the map, and you are referring to it. A Layer file object is a layer that can stand alone without reference and includes a layer’s symbology, data, etc.
- Raster layers have 3 types of colorizers: RasterClassifyColorizer, RasterUniqueColorizer, and RasterStretchColorizer that can modify symbology. Feature layers have 5 types of renders: GraduatedColorsRenderer, Graduated Symbols Renderer, Simple Renderer, UnclassedColorsRenderer, and UniqueValuesRenderer that can modify symbology.
- Properties of symbology objects are read-only, but methods can be used to give access to the properties. The color of a symbol can be modified using the color property of the Symbol object. In addition, you can also change the outline color, size, and predefined style through the symbol class.
- The camera object controls the XY and Z values of the map, for which 2D maps X and Y represent the center of the view. For 3D maps, XYZ represents the position of the camera relative to the view.
- One of the most common tasks using the mp module is to export a layout file. Other common uses that were discussed include: updating the data sources, copying layers from one map to another, and even replacing text in multiple projects.
Hollinger Week 4
Chapter 8:
Reading Notes:
-
- Search, insert, and update cursors. Can be created by using da.SearchCursor, da.InsertCursor, and da.UpdateCursor.
- Cursor classes in data access work much better than ArcPy cursor functions.
- A shared lock is applied when a table or dataset is accessed.
- Exclusive locks are applied when changes are being made to a table or dataset.
- You can use the SearchCursor class to write SQL queries.
- I honestly found the section on when to you what quotation marks a little confusing.
- The calculate Value tool is a Model Builder Only tool.
- When calculating Field the existing field must be referenced using its name surrounded by exclamation points. This syntax will not work in a regular Python IDE.
- You can use the calculate field tool in ArcPy by using the CalculateField function.
- Arcade expressions can also be used in a Python Script. When using Arcade in the Calculate Field Tool you use one block instead of having the expression and code block separate.
- It is good practice to close files and you cannot ensure that a file that was opened will be closed otherwise. This will prevent unnecessary locks from occurring.
Answers to Review Questions:
-
-
- A search cursor reads all records and finds specific records based on certain (defined) attributes. An insert cursor adds new rows to a table. An update cursor may modify attribute values or delete rows in a table.
- Data locks occur because multiple processes may be trying to change the same table or file at the same time in two different applications. Shared locks occur when a table or dataset is accessed and exclusive locks occur when a table or dataset is modified. A lock can be released if the cursor is used inside a with statement, exclusively deleted, or the reset method is called on a cursor.
- Double quotes are often used around a field name, but the entire clause needs to be recognized as a string, so single quotes are placed around it. An escape character or triple quotes can also be used to solve quotation confusion. Some data like enterprise geodatabases don’t use any quotes. One solution to this can be to use the AddFieldDelimiters function, which will add delimiters for you before using it in the SQL expression.
- You can use WHERE, GROUP BY, ORDER, and TOP while writing ArcPy functions.
- You could use the Exists function talked about in Chapter 7 or arcpy.ValidateTableName(name, {workspace}), but Validate Table Name does not determine whether the Table Name exists. You could also use arcpy.CreateUniqueName() to ensure that you are not creating or overwriting a file that already exists.
- You can build your own custom expressions using the code block. You can define the function in the code block using the def keyword. Write your function and reference it to call the function as you would when programming outside of the code block in a normal script. This expression will be in a separate block from the code block when using Python. This allows you to perform more elaborate calculations. The edits that you make will be written to the table, feature class, etc. because you are using the Calculate Field tool.
- To read data from a text file you would simply write the following code: f = open(“C:/Data/mytext.txt”) and then f.read() on the next line. This script reads the entire file, but you could also specify how many characters you would like to read. You can also use f.readline() to return one line at a time. f.readlines() will read all lines and return them as a list. For CSVs you can import the CSV file and then use the csv.reader function. For CSV files you can skip the header row using the next() function before you start reading data.
-
Chapter 9:
Reading Notes:
- Geometry class creates geometry objects
- Other useful classes: MultiPoint, PointGeometry, Polygon, Polyline, Array, and Point.
- Array and Point are not geometry objects.
- Geometric objects can be used in geoprocessing or written to a feature class.
- For polygon features, the start and end coordinates will be the same.
- You can limit the number of vertices printed by using an if statement or a while loop.
- A search cursor can have a spatial reference set. If it is different than your feature class, geometry will be converted to the spatial reference of the cursor.
Answers to Review Questions:
-
- You may need the full geometry object when doing more complex operations or creating new geometry. It should only be used when you need access to the full object because it can be a relatively large dataset that slows down your script. You can use shortcuts like SHAPE@LENGTH when you only need specific portions/properties of the geometry.
- A point object is not a geometry object but can be used to construct geometry. Whereas, the PointGeometry Class is a geometric object that can take a Point object as an argument as well as a spatial reference argument. PointGeometry has a much more extensive list of properties and methods.
- To read geometry and print coordinates, you can use a search cursor in a for loop to iterate over rows of a feature class and the coordinates of each point. Each row will contain 1 point in a point feature class. For polygons and polylines, it is less simple. You will need to iterate over each row (which corresponds to the geometry object) and then iterate through the getPart() method to obtain coordinates for each part of the geometry before moving on to the next row.
- When multipart features are present, the way you work with geometry is impacted because you must not only iterate over each part and then points of a polygon or polyline feature (for example), but you must also iterate over each part of the feature. If the feature has holes, then you must include many if-else statements to take exterior rings, interior rings, and null points into account.
- To create new features using geometry objects based on a list of coordinate values, the script needs to iterate over the list, creating a point object for each coordinate pair. Then, those point objects need to be added to an array object. Then, the geometry object can be created by using the array as input and adding spatial reference. New features are created using an insert cursor or copying geometry objects to a new features class.
- The array class is used to hold a number of features that can then be used to create geometries. You may use it when creating polygons or polylines, for example, so that you can hold and define the coordinates of each part of a feature.
Hollinger Week 3
Chapter 6:
Reading Notes:
- Exists() checks if a dataset exists. I have never used this before, but I can think of a few times it would have been helpful.
- Catalog paths — paths recognized by Arc Pro.
- Dynamic properties — “the properties available for use vary with the nature of the object being described”
- * is a wildcard
- arcpy.ListWorkspaces(“”, “FILEGDB”) allows you to list all the geodatabases in a workspace.
- Most list functions in ArcPy return data elements in the current workspace.
- You can use functions like ListWorkspace(), ListDatasets() and ListFiles() to explore your data sets and workspace.
- Add brackets around the outside of an expression for list intervention.
Answers to Review Questions:
-
- Describe() is a regular function of ArcPy. The properties for use will be determined by the type of object returned (this is true for da.Describe() too). da.Describe() is a function of the ArcPy Data Access module. It will return the same information as Describe(), but as a dictionary. da.Describe() is more transparent, while Describe() is faster.
- System paths are paths recognized by Windows OS, while catalog paths are the paths recognized by ArcGIS Pro. This means that, for example, if you are exploring data in a folder in ArcGIS Pro it will expect a catalog path not a system path.
- To list geodatabase feature classes you must specify the geodatabase in the path, without specifying you will just get only shapefile feature classes. Shapefile feature classes will also be listed with .shp while geodatabase feature classes will not.
- da.Walk() takes the top-level workspace and non-required parameters for optional filtering to return workspace, folder, and filenames at each level. It can recognize both catalog and system paths. So, for a complex subfolder structure, the function will list the path and then all folders, files, gdb, and workspaces at that path.
- Some examples given for iterating in a loop are building pyramids for hundreds of rasters, describing all the fields in a dataset, reading several shapefiles, and copying them to another geodatabase. I personally have used them to create a multiring buffer around each of hundreds of polygons so I didn’t have to do it manually.
- List comprehension is a concise way to create a list by iterating over an object. For example: “[<expression> for <item> in <list>”]. You can also add an if condition to facilitate filtering. It may be used to be more concise when working with lists.
Chapter 7:
Reading Notes:
- Errors can occur from using a combo of spaces and tabs
- I would say that I most frequently use print statements and error statements as I am debugging.
- A single # is used for permanent comments and a double # symbol is used for temporarily commenting out lines of code during the testing process. I didn’t really know this. I usually always use single. I guess that is kind of sloppy though.
- Built-in Python debugger package is called pdf, but editors also include a debugging environment. I always found debugging packages so much more time-consuming to use than a debugging environment or other methods.
- Close ArcGIS Pro to release locks while running a script.
- To check for errors and report meaningfully: try-except to ArcPy messaging function
- You can specify multiple except statements within a try-except statement. You can also include a finally statement that will always run.
- I have never used a custom exception before. This is a neat and really useful feature.
- ArcPy will generate a system error when a geoprocessing error occurs.
Answers to Review Questions:
-
- Some of the most common syntax errors have to do with misspelled keywords/variables, missing punctuation, and inconsistent indentation
- Exceptions are errors that are detected while the script is running. These could be errors or unanticipated events. Handling exceptions allows scripts to be more robust because if the exception is caught then the program can continue running.
- To debug you might review the content of error messages (this will potentially give you error codes and other useful info to help you figure out what is wrong, but they can also be misleading), print messages to your script (ex: printing out steps as you go so you know what is completed before the error), comment out select code (eliminating the error by commenting out and isolating it, but this does not tell you why an error occurs), or use a python debugger (a tool that allows you to step through your code line by line).
- First, you should check for syntax issues. Then, set your breakpoints in the script. The debugger will run until a breakpoint is reached, but without it the debugger will go line by line. Run the debugger and at every breakpoint (if you are using IDLE, PyCharm, or a similar program) you will be able to see paths, variable values, etc. You can also step over code or quit the execution of the process while debugging.
- To use a try-except statement, you would write try: then enter and indent. This is where the code you want to carry out will go. Then, you will use an except statement (aligned with the try statement) followed by a specific exception. On the next line an indented line of code will follow that should be carried out if the specific exception occurs. So, essentially this type of statement says (generalized), try to run this code, unless this exception occurs, then do this instead.
- Using a custom exception will allow you to make your code and exceptions easier to understand. For example, in the text, a ValueError exception is replaced with the TooShortError. This makes your code more robust and useful because it will be more descriptive in telling what the problem is for you and other users.
Hollinger Week 2
Chapter 3:
Reading Notes:
- I don’t think that I have ever searched for a tool using the analysis gallery. I usually always go straight to the geoprocessing pane, which seems more robust anyway.
- Built-in tools: Built using ArcObjects and compiled in PL like C++.
- Script Tools: Python Scripts are accessible from the dialog box.
- Model Tools: Created using model builder
- System vs. Custom Tools
- Current vs. Scratch workplace: Current specifies where inputs and outputs are placed and Scratch is used for intermediate data in model and script tools.
- Environments can be set for the application, the individual tool, the properties of a model, or a script.
- Data Connectors, Environment Connectors, Pre-Condition Connectors; and Feedback Connectors
- You can schedule a script to be run at a certain time.
Answers to Review Questions:
- The geoprocessing framework includes toolsets and toolboxes, the ability to search and run tools, environment settings, and parameters, dialog boxes for controlling and executing tools, ModelBuilder (a point + click visual programming language for sequence tools), a Python window, geoprocessing history and lots, and methods for creating python scripts.
- The three types of tools are built-in tools, script tools, and model tools.
- System tools are installed as a part of the ArcGIS Pro Software and created by ESRI. Most system tools are built-in, but some are scripts. Custom tools are created by a user or obtained by a 3rd party and usually consist of script and model tools.
- Different environments include: Workspace defines the path of where your datasets are located and where your inputs are and outputs will be. There are also settings for specific data types and functions as well.
- The limitations of batch processing are that filling out the tool can take some time and the tool does not execute faster than normal. However, the strengths are that once you have populated the batch tool it can run multiple times without user input which can be nice for repetition of a task (for example, clipping multiple layers to the same extent).
- Dynamic naming allows you to create a unique name for each output layer in batch processing. %Name% is used to take the first part of a layer name and create the output name. Without this step, the file would be continually overwritten. The same process could be done for a path and other output elements.
- ModelBuilder requires no programming experience and has little syntax. Scripting has some functionality for lower-level tasks and more advanced programming logic that Model Builder does not. Scripting can also be used to combine applications and can stand alone outside of ArcGIS Pro. The two are similar because there are many geoprocessing workflows that work in both ModelBuilder and Scripting.
- You may choose a script workflow instead of a model for a lower-level task or a more advanced function/extension with additional packages that can only be done in scripting. Additionally, scripting allows for the use of other software like Excel or R as well. Then finally, as mentioned above, scripts can be run and stand-alone outside of ArcGIS Pro.
- I am honestly not 100% sure if this is what this question is asking, but to automate workflows you can run Python code in ArcGIS’s Python editor or use an external editor like IDLE or PyCharm.
Chapter 4:
Reading Notes:
- Immutable vs. mutable
- I have never used a tuple before so I looked it up. It’s basically a list but you cannot edit its contents.
- The most important statements in a programming language are statements that assign values to variables.
- Every object has a value, a unique identifier, and a type.
- Methods are functions coupled to an object like: <object>.<method>(<arguments>)
- F-strings example: f”The temperature is {temp} degrees”
- Pairs are also referred to as items in the dictionary
- Set is another datatype to organize elements. It is an unordered collection without duplicates and the elements are enclosed with curly braces. Elements of a set must be immutable.
- input() function gets user input
Answers to Review Questions:
- The main data types are strings, integers, float, and Boolean. Lists, tuples, and dictionaries are more complex data types. Strings, lists, and tuples are sequences. Strings, numbers, and tuples are immutable because you can replace them with new values, but not modify them. Lists and dictionaries are mutable.
- True division is a floating point division where the result of division is reported as a decimal even if the numerator and denominator are integers. In floor division you use the // symbol and the division is truncated to zero decimal points, except for with negative numbers where the result is rounded up (really down) to the nearest whole number.
- Dynamic assignment of the variable means that the type of your variable will be automatically inferred based on whatever values you assign to it.
- variable_name1 and variablename2 would be examples of good variable names because they consist of only letters, digits, and underscores and they don’t include Python keywords or variable names. In a real scenario, these should also be more descriptive of what the variable represents like count or my_raster.
- An expression comes from literal values using operators and functions, but a statement is an instruction that tells the computer to do something.
- Quotation marks are used to denote something as a string in Python. Double and single quotation marks can be used interchangeably.
- Unicode strings are strings stored in characters of the Unicode system which is designed to represent every character from every language. Because of this, you can work with many different languages in Python.
- Five built-in Python functions — #1: print(x) would print the contents of the variable x. #2: id(x) would return the unique identifier of the variable x. #3: type(x) would return the object type of the variable x. #4: abs(x) would return the absolute value of the numeric variable x. #5: round (x, n) would round the float variable x off to n number of digits.
- Dot notion may look something like this <object>.<method>(<arguments>) and it is when the object is written before the period with the method following. It shows that whatever is after the period belongs to the object before the period.
- Forward indexing will assign elements an index from first to last starting with 0. Reverse indexing will assign elements an index from last to first starting with -1.
- Three methods of string objects — #1: join() method given a list of elements will join them into a single string. #2: strip() method will remove any of the given characters in the argument from the string no matter what order they are in. #3: replace() method will replace one substring with another everywhere it occurs.
- Lists and Tuples are generally the same except that you can modify a list while tuples are immutable and the sequence and elements cannot be modified.
- A Boolean is used to evaluate if an expression is either true or false.
- To create a dictionary you would populate it as follows: dictionaryname = { “Key” : ”Value”, “Key2” : “Value2”, “Key3” : “Value3” } You could also create an empty dictionary by not putting anything in the brackets. To add an element you would do as follows: dictionaryname[“Key4”] = “Value4”.
- You should avoid backslashes because they are used as an escape character in Python.
- Branching is kind of like a chose-your-adventure situation in the sense that you just need to decide to take one path or another. Typically this means using if statements.
- A compound statement is a block that contains multiple statements and statements that determine when other statements will be executed like if, for, while, try, and with.
- Two main loop structures: A while looping structure runs the other statements within the block while the argument given in the while statement evaluates true. Then there is a for loop which typically runs for the duration of a sequence.
- You can use a backslash as a line continuation, or (), [], and {} as an implied line continuation to improve readability for long lines of code.
- Comments provide information and descriptions about your script that can help you remember and others understand why the script was created.
Chapter 5:
Reading Notes:
- ArcPy is organized into modules, functions, and classes
- Workspace is your default location for files and can be set in a script
- Good practice not to add extra spaces
- Quotation marks are always straight in Python
- Parameters have a name, type, direction, and required value
- Non-tool functions are available only in ArcPy
- Environments are set as properties of the env class
- All functions have a reference/help page that includes sample code, syntax, and explanations of each parameter.
Answers to Review Questions:
- Geoprocessing tools in ArcGIS Pro can all be accessed through ArcPy. To reference a tool its tool name is often the same as the tool label in ArcGIS Pro without spaces. To reference a tool you would also need to include its toolbox alias.
- Required parameters must be specified for a tool to run. Optional parameters are just as they sound, optional, and are usually indicated in documentation by curly brackets. This affects script writing because parameters must be specified in the order listed in the tool documentation. You can specify the name of a parameter or fill its spot with “” or # when not defining all of the optional parameters.
- An example of using variables instead of hard-coded values as parameters would be: arcpy.Clip_analysis(input_file, clip_file, output_file).
- The result object can be used as input for another function as it may contain the path to a dataset, it may also return a string, number, or Boolean values. The result objects will also include messages and parameters based on the tool run.
- Classes are used as input parameters as a shortcut that would often be much more complicated. This helps in scenarios where parameters cannot be defined by just a simple string like coordinate systems for example.
- To reference a coordinate system you can use arcpy.Describe(), arcpy.da.Describe(), use the name of the coordinate system (ex: arcpy.SpatialReference(“NAD 1983 StatePlane Texas Central FIPS 4203 (US Feet)”), or using the factory code/well-known id (ex: arcpy.SpatialReference(2277)).
- Some typical environments set in a script are the workspace (ex: arcpy.env.workspace = “C:/Data”), the cell size (ex: arcpy.env.cellSize = 30), and allowing overwriting (ex: arcpy.env.overwriteOutput = True).
- You can obtain a meaningful message by using arcpy.GetMessages(), which is typically the most useful and will give you a list of messages. arcpy.GetMessageCount() will allow you to obtain the number of total messages and can be useful for viewing the last message. Finally, arcpy.GetMaxSeverity() will return a severity level indicating an information, warning, or error message.
- ArcGIS Pro is licensed with a Named User license, a Single Use license, and a Concurrent Use license. Available products may vary based on the user account. Scripts will not run and extensions using ArcPy cannot be checked out if no license is available.
Hollinger Week 1
Chapter 1:
Quick Answers to Review Questions:
- #1: It is a general purpose language, free and open source, and works cross-platform (but this doesn’t typically matter for ArcGIS runs only on Windows).
- #2: It means that Python does not need compilation in binary before running.
- #3: Scripting is automating functionality in another program, while programming focuses more on the development of applications.
- #4: ArcGIS Pro uses Python 3. The current version at the time this book was written was Python 3.9.18.
- #5: Investing time and effort into learning Python is important because while it can take time to write scripts, in the end they can be used for repetitive tasks, or adjusted and reused for multiple projects, so automating some of your workflow saves time in the long run! Python also has a lot of other application so it’s a very transferable skill beyond ArcGIS.
- #6 The main goal of developing scripts for ArcGIS Pro is to automate a task that would typically need to be done manually.
Chapter 2:
Quick Answers to Review Questions:
- #1: Integrated Development Environment
- #2: Python is an interpreted language because when you enter commands they are interpreted and then carried out.
- #3: IDLE
- #4: Primarily IDLE and PyCharm in this book, but Microsoft Visual Studio and Eclipse are widely used for Python generally as well.
- #5: Syntax will always be the same for all editors, but there will be differences in how scripts are created, organized, and tested. IDLE is good for beginners and simpler scripts, but PyCharm has more functionality. PyCharm can handle multiple versions and environments, while IDLE needs a different version for each Python version and environment.
- #6: IDLE is installed by default with every Python installation and PyCharm needs to be installed by you. To access and configure IDLE if you have ArcGIS Pro on your computer all you have to do is navigate to a script, right-click, and hit “Edit with IDLE (ArcGIS Pro)” and it will automatically use the active ArcGIS Pro environment. PyCharm is a bit more complicated. Simply put — you need to Open a New Project and then set a Custom Environment (selecting conda and arcgispro-py3) when starting a new project. You can also set the interpreter for new projects going forward and change it for an existing project.
No questions from me this week! I have used PyCharm, IDLE, and Python before so this was all a good refresher!
Applications I Googled:
One of the applications I found was a python GIS flood tool. It uses “commonly available topographic data and commercial geographic information system” to make flood vulnerability mapping more accessible to communities where it might otherwise not be!
This is the example map they gave:
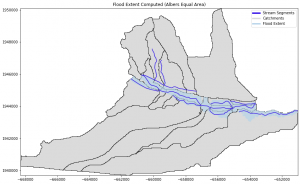
Source: https://www.usgs.gov/software/python-gis-flood-tool-pygft
This next one isn’t necessarily python related, but they used ArcGIS to simulate a Zombie outbreak, which way zombies would travel, and model where they would go next. They didn’t explicitly mention Python, but I have used Python and ArcPy for one of the methods they used (Buffer Analysis) so I’m sure it could be incorporated for further Zombie prediction in this area and beyond!
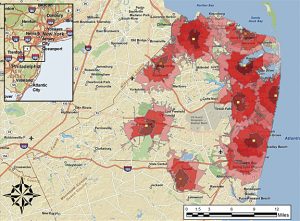
Source: https://www.esri.com/about/newsroom/arcuser/the-undead-liven-up-the-classroom/


Week 3 – Weaver
Chapter 3:
- Geoprocessing allows you to perform spatial analysis and modeling as well as automate GIS tasks
- Types of tools in ArcGIS Pro
- Built-in tools
- Script tools
- Model tools
- Chapter is in depth about geoprocessing tools (already know how to use)
- Batch processing – execute single tool multiple times using different parameters without further intervention
- Model builder is can help build a sequence of geoprocessing tools that flow through a visual model
- Can also use scripting to build model
- Modelbuilder = visual based
- Python = text based
- Scripting has functions that modelbuilder does not have
- You can schedule python script to run at certain times
- Good for routine checks
Chapter 4:
- Chapter covers fundamentals of Python language
- Several different data types: strings, numbers, Booleans, lists, tuples, dictionaries
- Two numerical data types
- Integers (whole numbers)
- Floats (fractional numbers)
- Booleans contain only true and false values
- // is floor division
- % is modulus
- ** is exponents
- A set of characters surrounded by quotation marks is called a string literal, or string
- Do not copy and paste code – curly quotation marks will create error
- Can use str() to put a number into a string
- Function is like a little program that is used to carry out an action
- Ex: int() str() print() type()
- Method is a function that is couple to an object like a number, string, or list
- The book is giving us a lot of examples of different things to do with the python and there are so many little nuances
- == to see if two things have the same value
- This chapters goes through all the different examples how to use python script – a lot of info, alot to try and take in
Week 2 – Weaver
Chapter 1:
- Scripting language
- Automating certain functionality within another program
- Programing language
- Development of more sophisticated multifunctional applications
- Python is scripting language of choice for ArcGIS Pro
- Used to make redundant tasks/ large amounts processed faster and more efficient
- The example scripting scared me as I have never coded in my life
- Python is more basic than C++, easier to work with
- Python is both a scripting and programming language
Chapter 2:
- IDE: integrated development environments
- Scripting is a list of commands that can be run by a program
- Work with python in so-called command line or command prompt
- Use the command line that is provided with ArcGIS Pro
- Want to use arcgispro-py3
- IDLE: Integrated DeveLopment Environment
- “Python Shell”
- So when doing my very first line of code I already got errors…
- I went and looked at past students and it seems I am not the only one to have run into this problem
- Since an error came up I did not know how to make the shortcut on the desktop
- >>> is prompt
- Different colors are assigned to different parts of the script
- Writing script vs code different
- Script menu – file > new file and this opens new untitled window (script window)
- Spyder: Scientific Python Development Environment
- Package info outdated (dif buttons)
- Hard time trying to get Spyder short cut
- Python scripts = modules