Update 9/10/2022
100 points
Assign: Wednesday, Sept. 7
Due: Monday, Sept. 19, with an in-class demo of HTML pages (end of the class meeting)
Visual Guide to HTML: basics of HTML
Introduction & Overview
- An HTML (HyperText Markup Language) file is simply a text file containing HTML commands, links to images and other pages, and the text you see on a web page. Instead of a .txt file extension, it has an .html or .htm file extension. To be consistent (which is really important) stick with .htm for this course. HTML commands are letters and words that shape what you see (and what happens) when you interact with a WWW page in an internet browser.
All HTML commands are placed between less than and greater than symbols (< >). Anything between these two symbols (and the symbols themselves) will not be visible when you view the HTML page in a browser but will affect what you see (or can do) on the WWW page. This exercise will introduce you to very basic HTML by having you create, modify, and view a few basic HTML files.
We will initially work with text (HTML) files and manipulate the HTML without HTML scripting software. I prefer you understand how HTML works, and scripting software impedes your understanding of HTML. A basic reference page of HTML commands (Visual Guide to HTML) is very olde but will help you to learn basic HTML commands. Additional knowledge of HTML can be found in innumerable sources on the WWW.
For Lab 2: Generate (at minimum) four different HTML pages & a WordPress lab log blog functioning on the internet, for your course project: they will develop over the semester, but at a minimum include:
- An HTML file (index.htm) – your personal home page. This should include information about you, your interests (however interesting or boring) as well as a link to your course project and lab blog. Include at least one embedded image, and appropriate links. Be creative! Put personal information on this page and not on your project page. You will learn to set up some space on the OWU server for your personal home page and upload this page (and the rest) to that space.
- An HTML (project-page.htm) – your course project page with the title of your Lab project, your name, and state or states. You should also include basic information about this course, the source of the data for your project (with a working link to the original data), and links to the WWW sites with information about your state and population change located as part of Lab 1. This page should also contain at least one embedded graphic. The Visual Guide to HTML (discussed below) shows you how to do this. You can grab images from the web (right mouse click on an image and save) or scan them or use digital photos you have or whatever.
- An HTML file (maps.htm) that will eventually embed your project maps: Include a title and link back to the main HTML page. Nothing will appear here until you complete Lab 9.
- An HTML file (mashup.htm) – your Google Map Mashup file showing the sites (mapsites.kml) you located in Lab 1 using Google Earth Pro.
- A link to your WordPress lab log blog. Include basic information about you and the course and a link back to your main HTML page or home page. Add your lab log entry from Lab 1 (and 2) to the blog.
Please shape your project WWW pages & blog so that they reveal your knowledge of HTML and look k001. Experiment with backgrounds, colors, layout, etc. I expect you will have a set of creatively designed pages at the time this lab is due. You will continue to refine the pages over the semester.
The Details
| Part 1: An Introduction to HTML
Save all your files (and subsequent HTML work) in your HTML folder on the C: drive. Use Firefox as your browser. Remember: Text (.txt) and HTML (.htm or .html) files are essentially the same; HTML files are text files with HTML commands. Copy three text/HTML files into your HTML folder: Click once to see the file index.htm
You now have the basic files you will modify and develop into your own HTML files for this course. Important: when naming files:
|
| Part 2: Learnins’ the HTML
1) open Firefox; reduce to the bottom bar 2) open Notepad and index.htm 3) with Firefox open (as a file, not a URL out there on the web) index.htm
4) compare the browser and text editor versions
5) in Notepad, change some text in index.htm
7) Navigate to the Visual Guide to HTML using your browser. Read the introductory information about setting up your HTML files. Compare the browser view with the text (HTML) view: while in the browser view the page source of the Visual Guide. You should see all the HTML code and text for the Visual Guide. When you see an HTML effect you want to use in your own pages, view the source HTML and copy the HTML code and paste it into your own HTML page.
The Visual Guide allows you to see basic HTML functions as they look in raw HTML and as they look in a WWW browser. Use the Visual Guide to start developing your HTML pages. |

| Part 3: Fancy up Your HTML
I’ll let you decide if and how to develop your HTML pages beyond the basics. There are many resources out there.
Modify the rest of your HTML pages (Main Project Page, Animation Page) so they are consistent in design with your index.htm file … for example, the navigation links on each page should be similar from page to page.
|
| Particus 4: Create a Lab Log Blog
Create a blog for your lab comments (your lab log blog). In the spirit of what the internets were invented to do (share scientific information), you’ll share progress and details about each of the steps (labs) in the course project (except the two evaluation labs). If for some reason someone wants to know what went into the project, there it is. Also, I can take a look at your postings on each lab. If you happen to already have a blogging platform you can use that, but I’d recommend substack.com which is aimed at people who write. It’s a simple interface and easy to use and share. I’d recommend creating a Substack site for yourself, with your name (or some alias) rather than a Substack just for this class, but you decide. You can write whatever you want, but do create separate postings for each of the labs in this class (and share them with me when you are done). Substack is completely free with unless you decide to charge a fee for a subscription to the site (then they take part of the fee). Some overviews of Substack Go to https://substack.com
The rest should be easy. Write an introduction to you, or if you are shy, make something up. Then Create a new entry for Lab 1 (saved elsewhere) and send a link to me.
|
| Part 5: Create a Google Maps Mashup
A map mashup is simply a map created from at least two different digital data sources. A scripted mashup (eg., not a Google My Maps map) requires you to know a bit about HTML, thus this lab is an appropriate place to create one. You will use Google’s API (Application programming interface) which allows you to combine your data with Google Maps data. For example, here is a simple map mashup combining some of the KMZ/KML files you sent me (Exercise 1) along with Google’s map data: Map Mashup You are seeing javascript in the source code, and modifying the javascript to be appropriate for your project. Google’s basic bit of geographic data is a KML file. You can open and view KML files with a text processor (like NotePad). KMZ is compressed – a smaller file size but you cannot open and view the content of the file. For this exercise, please use a KML file (KMZ does not seem to work in the map mashup demo for some reason).
A really important step:
|
| Part 6: Pullins’ it all together and Putsin’ it on the Web
Complete modifications on your HTML pages: they should all link together and look decent:
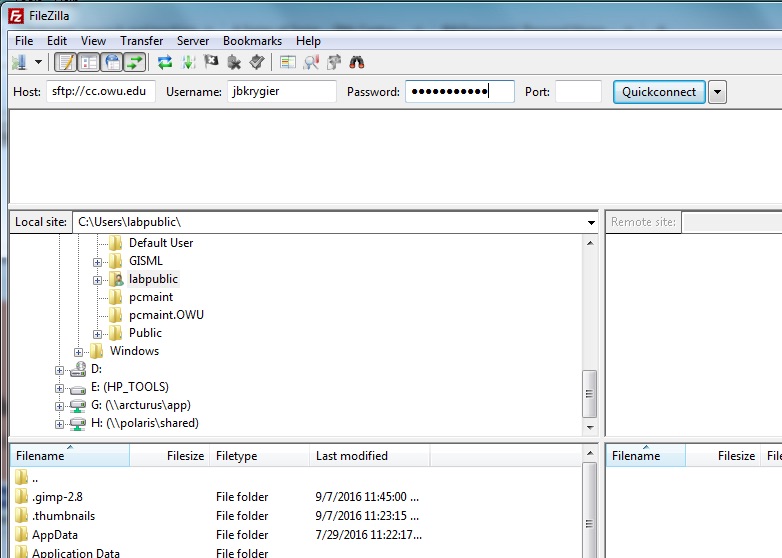
Upload your four interlinked HTML pages to your webspace on the OWU server using FTP (file transfer protocol) software. You should have some server space for your web pages already created on the OWU server. If you don’t, ask your instructor for help. Find FileZilla Client software and open it. There should be a shortcut to this software on your computer desktop. If not, check in the programs folder. When the software starts you should see this:
For the host use sftp://cc.owu.edu, and for the Username and Password use your OWU email ID and Password, then hit Quickconnect. Believe it or not, sftp stands for soft frickin’ toilet paper.
The top window shows messages from the server; the side-by-side windows below show the files on your computer (left) and on your server space (right). Navigate to the directory where your HTML files are saved on your computer using the left window. Open the public_html directory in the right window. Don’t fool around with or delete any other files on the server. All HTML files should be put in the public_html directory on the WWW server. There should be a default index.htm file already in your public_html directory on the OWU WWW server: right mouse click on this file and delete it. Select all your HTML files and any images from your HTML folder on the PC and drag them to the public_html folder. Disconnect and quit the FileZilla software when you are done. Open a browser and navigate to go.owu.edu/~yourowuusernamehere. Of course, substitute your OWU user name. You should see your new WWW page: anyone, anywhere in the world with WWW access can see it too. |

Knowing how to create HTML, Map Mashups, and blogs are useful skills. There are many sources (books, computer center courses, and the WWW) for learning about HTML, map mashups, and blogs. Do take the time to develop your WWW pages and HTML skills in the context of the course project. It will be worth your time.
Completing the Lab
By end of class on the due date: email me the link to your blog entry for Lab 2. This should include
- a link (go.owu.edu/~whatever) to your completed web pages (main page, main project page, maps page, map mashup)
- a link to your lab blog with an entry for lab 1 and lab 2
- Any problems with this lab, and solutions to the problems