Chapter 5: Caching and On-Premises Web GIS
ArcGIS Enterprise is more user-managed than ArcGIS Online and allows for the use of on-premises GIS, which may be helpful for organizations operating with limited internet connection. The chapter refers to ArcGIS Enterprise services as being “deployed,” which I think is a good word in this context. It also allows operations to remain more private and limited to the specific organization, while also utilizing ArcGIS data and basemaps (through hybrid Web GIS). The ArcGIS Portal compiles the various types of ArcGIS data and shares it within the designated organization. It serves as the “connector” between ArcGIS Online and the organization’s ArcGIS Enterprise. ArcGIS Server allows for the use of geographic information by the organization.
This chapter also describes the differences between different web layers hosted by ArcGIS Online and ArcGIS Enterprise. I appreciated the refresher on vector and raster layers: vector layers contain more specific data typically based on density, while raster layers are more complete image files like basemaps. Raster layers are best for unchanging data, and they take up more storage, while vector layers may frequently change, but are lighter in terms of storage. Also, ArcGIS Online uses caching, which involves returning to previous requests on the web server to generate tiles, reducing response time and improving user experience. The raster and vector layers are precached, so they are already stored in the database and can be accessed quickly. At the end of the description portion of this chapter, there were a lot of helpful flowcharts and tables detailing the requirements and ideal uses of each type of layer.
In the embedded version of the maps in Tutorial 5.3, the left side is the raster map, and the right side is the vector map. The vector map has noticeable higher-resolution lines and labels, and the raster map data disappears when you zoom in enough.
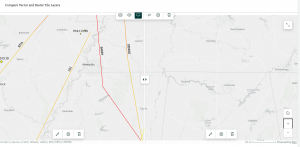
Figure 4.1: side-by-side of vector (left) and raster (right) tile layers. An indication of which is which comes from the disappearance of raster data at a zoomed-in extent. When saving the raster data, we kept it rather coarse to reduce the amount of storage required for the layer.
Chapter 6: Spatiotemporal Data and Real-Time GIS
As the name suggests, spatiotemporal data is data that changes through time. Different types of spatiotemporal data include moving data, discrete data, stationary data, or change data. Real-time GIS utilizes spatiotemporal dat and can either focus on point-in-time data (one field) or duration of time (two fields: one for start time, one for end time). When working with spatiotemporal data, it is important to consider systems of time data, such as measurement and reference systems, representations, and temporal resolution (time interval of sampling).
Another neat aspect of widely disseminated spatiotemporal data is the Internet of Things (IoT). This chapter refers to the IoT as an “ecosystem,” which I think is a neat (and pretty accurate!) way to refer to the massive web of time-based information that is utilized by any GIS-based service. The IoT contains a lot of raw data that GIS applications turn into useful information. An example that the chapter uses is smart cars, and how routing, maps, and road conditions are all utilized by the car for a smooth and safe driving experience.
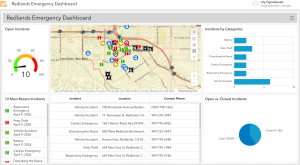
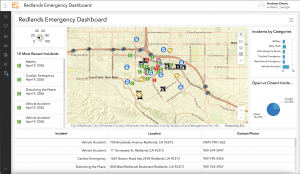
Figure 4.2: the completed emergency dashboard after Tutorials 6.1 and 6.2. As I was working on this, it was updating and the open incidents number went down!