Ben Buroker
Spring 2023
Geograph 192
Week 4: Chapters 3 and 4
Chapter 3:
The “Experience Builder” function of arc online is one of the things that blows my mind about the webpage. The things that ArcOnline can do are really incredible and useful. I think the web experiences capability is super cool and will be fun to play around with when designing web apps and maps.
Exercise 3.1:
I always get scared having to add data in any GIS setting because it has gone wrong in the past… But I successfully added the 2d sample map so that was good. I had a hard time adding the “Views Navigation Widget” because it didn’t automatically link to my map and there are no options in the right hand tab under “Link to:”.
Exercise 3.2:
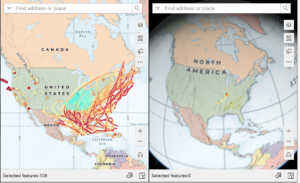
Screenshot from the preview tab only showing the hurricanes and earthquakes selected on the 2D Map on the 3D Map.
Exercise 3.3:
When I click on the “Dynamic Content” button on the toolbar nothing comes up. This is on page 91 of the book. I can’t complete any of the next steps because I don’t see a “statistics”, “data”, or “operator” button.
Exercise 3.4:
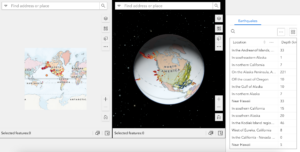
This is my map after adding the earthquake table in 3.4. Also this link is a draft view but should still work! (https://experience.arcgis.com/experience/85e2290efe0a405da0f13fcabb6ec603/?draft=true)
Exercise 3.5:

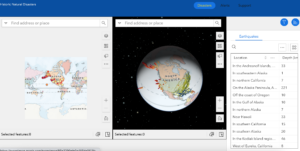
My map after 5.3 showing the chart function and only the selected earthquakes from the year selected on the donut chart. Creating this went smoothly and I apprecaite the depth of information you can provide with charts like this one.
Exercise 3.6:
I had a hard time with embedding the image on the new page I created because the Url in the book didn’t have an https and the text box/arconline only supported https. I just added “https://” to the front of the URL and it embedded an image. I don’t know if it’s what it’s supposed to be though.
This is my finished map with the new header from 3.6.
Chapter 4:
The mobile apps strike me as a super powerful part of arconline. The introduction section about the “post-PC” era made a lot of sense and it is cool that things like GIS are adapting to the technological developments and are able to be used with the powerful technology my generation has grown up with. The concepts and advantages section on pg 110 and 111 is very compelling and makes it easy to see how the mobile apps could be useful for people using GIS.
Exercise 4.1:
On page 127, where the tutorial asks us to pick “Imagery Hybrid” for the basemap of our survey, I couldn’t find an option labeled this. I just chose imagery with labels, hopefully that is what they wanted.
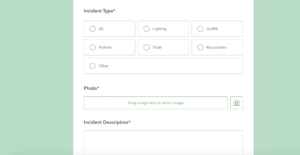
This is a screenshot of my survey preview after this section was completed.
Exercise 4.2:
It was entertaining to practice taking the survey I just created and to see how it all worked. I liked how the recyclables question popped up when I selected recyclables as the incident type. I can imagine creating much more in depth and informative surveys using this framework.
Exercise 4.3:
At the top of page 136, where the tutorial tells you to notice how the “incidents_layer” has attachments enabled, it doesn’t actually have attachments enabled. I manually enabled it using the toggle buttons. Before I could share my layer/map that I made in this exercise I needed to go into settings and click the “Public Data Collection” box.This might have been prompted earlier in the tutorial and I missed it but I wasn’t able to share until I did it.
Exercise 4.4:
There is no conditional visibility option as mentioned on page 139. I think that the name has changed to calculated value as there is an “add expression” cue under this option. I actually couldn’t figure out what it was asking me to do at this point and wasn’t able to complete this tutorial. This also meant I couldn’t complete 4.5, the Field Map exercise because I didn’t have the Public Works Inspection web map that I was supposed to be able to make in 4.4.
Exercise 4.6 and 4.7:
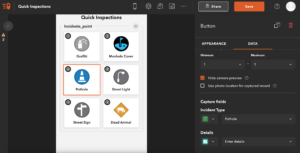
This is the Quick Inspections quick capture map that I created in exercise 4.6 and used on my phone to capture images in 4.7.
Exercise 4.8:
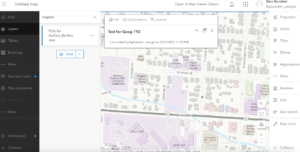
This is the test POI that I created in the map for this exercise.
Exercise 4.9:
The AuGeo app is super cool and being able to look at the first person camera view of the POI’s you add is really cool. It was also really simple to add a POI and this could be really good for something like making a campus map with street level views.
Potential Application:
Exercise 4.9 inspired me to think about the applications of AuGeo and I could really see it being used to make an OWU campus map that included POI’s that would open up to street-level images of OWU buildings. This way, visitors could look at our typical campus map, click on a building they want to see, and then see it from street level. As I mentioned above it is pretty simple to create the POI’s and I believe the photos are already out there so I feel like this is a pretty realistic application of the techniques we practiced.