Bzdafka Week 4
Pinde fu chapter 5: This chapter is about the difference between ArcOnline and ArcEnterpise. Enterprise uses local data and infrastructure, whereas online uses Esri and online cloud based data and infrastructure. Enterprise keeps things private, which is sometimes desired, it also has certain functions that are not available online. Enterprise uses servers to host different types of layers and data. Using enterprise, it is possible to share information with a sole entity such as different municipalities sharing information with the city, or it can be shared within an organization such that all municipalities can share information with each other and the city so they can collaborate more efficiently.
Vector layers can be hosted on the web which means that they can be cached. This means that if someone requests to view a map for the first time it could be slow, but when it is viewed subsequent times after it has been cached the load time will be faster.
Web layers can also be created in Pro, to do so just project your data into web mercator, this helps align your data with common basemaps, remove irrelevant attribute fields, remove unused layers including basemaps, don’t use complex symbols, then copy data to server, select layer type, then publish.
Tutorial 5.1: To add or connect to a portal in ArcPro open the application, then go to settings, and portals. Here you can use a url to add a portal or sign into a portal that is already active.
5.2: We took a map that was made in ArcPro, and shared it with a web account. To do this in the map properties enable sharing of unique numeric ID’s, then go to the share ribbon, then web layer, and publish it as a vector tile layer. You can configure the tiling scheme so that it is compatible with other entities, such as google maps, or bing maps. To do this go to configure, liling scheme, then select/input the places you want your layer to be visible.
5.3: To generate a raster layer do the same process for a tile layer, but select a tile layer instead of a vector tile, then configure it so that level of detail is 0-8. Then make it configure automatically on the server.
5.4: In this tutorial we compared vector and tile layers by using a storymap to display both layers at the same time. The tutorial has sample layers that are available to use for the display. The swipe insert was used to easily show both types of layers at once. The raster layer is only viewable up to a certain magnification, and it also keeps the text locked in a static position, so if the map is rotated it is hard to read.
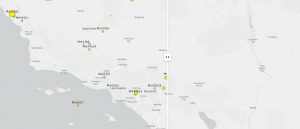
Comparison between vector (on left) and raster (on right).
If I were to be looking at data within a small area like a county or a city, I would use a vector layer. If I were to map property values for different neighborhoods by size I would want to use a vector layer.
Pinde fu chapter 6: This chapter focuses on spatiotemporal data. There are different types of date that encompasses movement space and time, these include:
- Moving: these are things that move such as vehicles
- Discrete: these are events that occur throughout time
- Stationary: this includes values that change over time such as a weather station collecting wind speed over time
- Change: focuses on how land changes, such as from fire or floods
Realtime GIS includes data that is continuous and is constantly being updated, such as data from weather sensors or stream gauges. Temporal data can be represented by many units and GIS is flexible with the units that are used and how dates are imputed. This includes the use of different universal “time zones” ; GMT accounts for daylight savings time and UTC does not. Something that is becoming increasingly used is the loT, which is a network of physical objects embedded with sensors that allow for the exchange of data between one another.
A relatively new product is ArcGIS velocity, which allows for sensors to be connected to maps, this also generates new items that correspond to the sensors. This list includes feed items, which allow for sensor input. There are also items that are used for realtime analysis, as well as items to analyze large amounts of data. When analyzing realtime data, there are two ways to go about acquiring the data: poll which polls the server periodically to acquire data, or to use a push which sends data to a web client that helps with processing the large amount of incoming data.
ArcGIS dashboard is a way to integrate web maps with other kinds of data, it can display wind speed, water quality, population density, and other parameters as they change over time. This was likened to how a car’s dashboard displays information such as speed, a fuel gauge, temperature, tire pressure, and gear position.
Tutorial 6.1: The web map for the Redlands dashboard hosted by Esri was opened. This map displays emergency dispatch information such as police cars and ambulances, which are polled every 30 seconds. We were able to add a layer into the map that showed live images, taken every 30 seconds.
6.2: To create a dashboard go to apps, dashboard, and create. To add a map press the plus button then click map. When adding a map there are a few things you can toggle, we displayed a legend, layers, baselayer, and allowed for zooming in and out. To add a gauge (we used emergency incidents) click the plus sign, then the plus in the middle of the screen, then gauge. Here you can configure expressions to display certain fields. You can also change the way the gauge is displayed, we used a meter. To add colors to the gauge, use the guides tab and add guides for different percentages. To add a list (ours displayed the 10 most recent incidents) add a list element, then you can manipulate the maximum number of displayed items, and the fields used. Once you select your fields go to the list tab then use the curly brackets to insert your fields into the line item template. You can also add a title in this tab.
6.3: To enable certain actions to trigger filters, or map changes, add a category selector by adding an element next to the header. To set actions that will trigger things to happen use the actions tab in the configuration. To make it so that when you click on an item in the table it changes the map, goes to the table, and clicks configuration, then actions, then enables zoom, flash, and filter.
6.4: It is possible to use advanced formatting (arcade) to alter the colors displayed in the table to show different types of incidents.
6.5: This tutorial has us allowing for time to be used in our dashboard. Using the USPop200 that was downloaded from the tutorial, we made it into a hosted feature layer. Then going to the layer from the overview of the map, select the pencil over time, then enable time and specific events on time.
6.6: To configure the time slider, use the gear button on the slider itself. From here you can alter the amount of years it goes by under the time interval pane, and the speed by which the slider moves under the play rate tab. Then by converting the map to a time slider app we
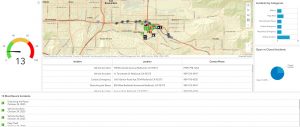
Dashboard made in chapter 6 tutorial
I could see this being useful to display different types of climate data, such as wind speed, direction, temperature, and other things like that. It could also be useful for displaying data from a field map, making it interactive and allowing for searches.